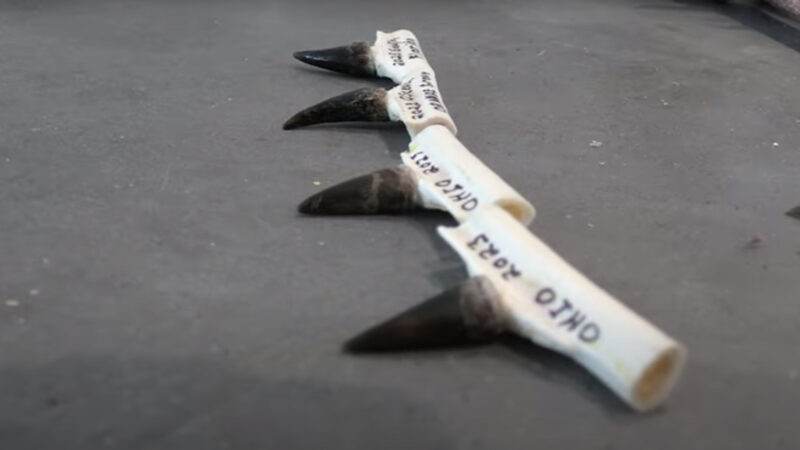
Your turkey tag is punched. You’ve got the fan cleaned up and drying out. You toss the beard in the cigar box with all the other beards from over the years. But what about the spurs? Do you really need another pair of turkey legs drying out on a shelf in the garage or getting chewed up by the dog? Probably not.
If you find yourself looking for a better way to save the spurs, we’ve got you covered. Paul Morrison shares a look at how he preserves the spurs to create a memory with meaning and purpose to look back on in the years to come. Check it out in the video below.
Turkey spurs are a unique part of the turkey that can make a great keepsake or decorative element But cleaning turkey spurs takes some specific steps to ensure you end up with neat, white spurs free of tissue and blood.
If you are new to cleaning turkey spurs, have no fear! Follow this step-by-step guide to learn how to clean turkey spurs properly
Supplies Needed
Before you get started cleaning your turkey spurs, make sure you have the following supplies on hand:
- Turkey spurs
- Small knife or scalpel
- Pot large enough to submerge spurs
- Water
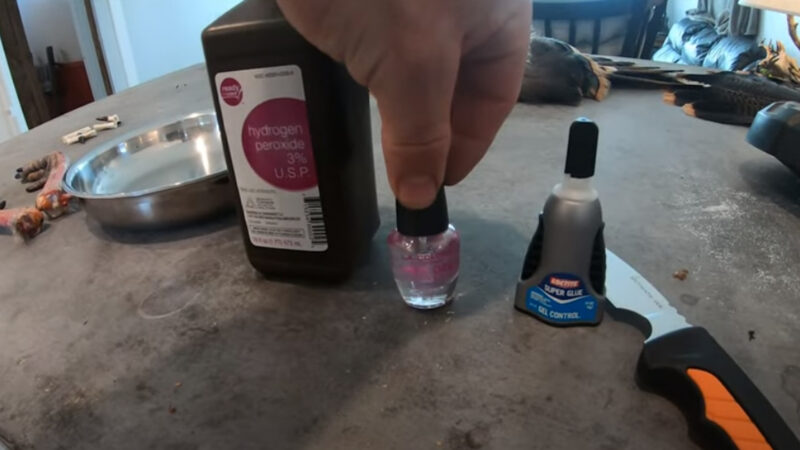
- Bleach or peroxide
- Small wire brush or toothbrush
- Sheet pan or drying rack
- Paper towels
Step 1: Carefully Remove the Spurs
Once you have harvested your turkey, locate the spurs on the bird’s legs. Use a sharp knife or scalpel to carefully detach the spurs where they meet the leg bone. Be sure to get the entire spur intact.
Take care not to break or crack the spur during removal. The spurs will be covered in blood, tissue and tendons that will need to be cleaned off later.
Step 2: Soak the Spurs in Water
Place the removed spurs in a pot and cover completely with water. Allow them to soak for at least one hour. This will help rehydrate the spurs and loosen any dried blood or tissue.
Change the water periodically if it starts to discolor from the spur residue. Clean water helps draw out impurities from the spurs.
Step 3: Scrub and Bleach the Spurs
After soaking, start working to remove tissue and debris from the spurs. Use a small wire brush, toothbrush or your fingers to gently scrub the surface of the spurs under running water.
Work slowly and carefully to remove all traces of blood, fat and tissue without damaging the spurs. Use a small knife to help scrape off any stubborn bits.
Once the spurs are clean of residue, soak them for 15 minutes in a dilute bleach or peroxide solution. This will help whiten and disinfect the spurs. Rinse well afterward.
Step 4: Dry the Spurs
Allow the spurs to air dry completely, either by placing on a sheet pan in front of a fan or on a drying rack.
Drying could take a few hours or up to a day depending on the size of your spurs. Make sure they are fully dry before storing or displaying.
Step 5: Polish the Dry Spurs
Once the spurs are dried, you can take them to the next level by polishing with olive or coconut oil. Use a soft cloth to gently buff the oil into each spur. This will create an attractive sheen.
Polish periodically with fresh oil to maintain their shine. The spurs are now ready to use in your desired decor or display.
Storing and Displaying Turkey Spurs
Cleaned turkey spurs should be stored in a dry location out of direct sunlight. A closet, cabinet or box are good options.
There are many creative ways to display your cleaned spurs:
- Mount as decor on a plaque or board
- Hang with twine or ribbon
- Place in a vase or jar
- Incorporate into a centerpiece
- Use as part of an autumnal wreath
- Attach to a turkey leg decoration
- Make turkey spur candle holders
Get creative with how you show off your cleaned turkey spurs!
Common Cleaning Mistakes
When learning how to clean turkey spurs, it’s easy to make some mistakes. Be sure to avoid:
- Failing to detach the entire intact spur during removal
- Using harsh scrubbing that damages the spurs
- Not soaking long enough to fully rehydrate
- Letting moisture get into the hollow interior of spurs
- Storing in humid, non-dry areas
Following the proper cleaning steps will ensure your spurs come out looking their best.
Enjoy Your Clean Turkey Spurs
With the right techniques, cleaning turkey spurs for display can be a very satisfying DIY project. Take your time and employ careful scrubbing and drying methods to end up with attractive decorative spurs to be proud of.
What You Need to Clean Your Turkey Spurs
The items you need to clean your turkey spurs are pretty simple and can likely be found around your home. Here’s a quick list of the items you’ll need to get started:
- Knife
- Saw
- Super Glue
- Clear Nail Polish
- Peroxide
Cleaning Turkey Spurs
FAQ
How to get turkey spur bones white?
How do you trim a Turkey’s Spur?
Walter’s spurs have gotten pretty sharp! If you need to trim a turkey’s spur, you can blunt it with cleaned wire cutters, pet or human nail clippers, or even a Dremel with the proper sanding attachment (when done correctly, this method is the least likely to cause the spur sheath to crack).
How do you preserve a turkey beard?
Dry the beard by patting it with a towel and using a hairdryer to finish the job. 4) If freezing for later, place in the same bag of legs and put it in the freezer. 5) Place the base of the beard in borax for a couple of weeks to dry and preserve. I keep the hull from the load that actually shot the turkey, you don’t have to.
Why do turkey hunters chase Gobblers?
Temperatures increase, insect populations rise, and thundering sounds of gobbles fill the air. The anticipation to get back out in the field brings excitement to spring turkey hunters. If you are anything like me, I can’t wait to chase gobblers and work on filling my tags.