Cook the most tender, moist, and incredibly flavorful Instant Pot whole turkey with perfectly crisp skin in under 2 hours using the Instant Pot Duo Crisp, Mealthy CrispLid or Ninja Foodi.
Weve used just about every method there is to cook turkey. Weve fried, spatchcocked, dry-brined and wet-brined our turkey. While they were good, they werent irresistible. Wed actually decided to pass on the turkey this Thanksgiving in favor of pot roast and ham. But, when we got an Instant Pot Duo Crisp just a few weeks before Thanksgiving, I couldnt resist trying a turkey in it. After one bite, my wife stated: “This is the best turkey Ive ever had. We need to add turkey back to the Thanksgiving menu.” If youre looking for tender, moist and incredibly flavorful turkey, youve come to the right place.
Cooking a moist and delicious turkey for the holidays can seem daunting, but it doesn’t have to be with the Ninja Foodi This multi-purpose pressure cooker makes it easy to cook a turkey that’s tender on the inside and crispy on the outside
In this comprehensive guide, I’ll walk you through every step of cooking a turkey in the Ninja Foodi, from choosing the right size bird to getting perfect crispy skin. With my tips and tricks, you’ll gain the skills and confidence to make this Thanksgiving centerpiece a huge hit with your family
Choosing the Right Turkey Size
The first key to success is selecting a turkey that will fit nicely in your particular Ninja Foodi model
-
For the 5-quart Ninja Foodi, stick with a small turkey breast under 6 lbs. The cavity is too tight for a whole bird.
-
The 6.5-quart Ninja Foodi can hold a whole turkey up to 8 lbs. However, you may not be able to use the air crisp lid due to the height.
-
For the 8-quart Ninja Foodi, a 10 lb turkey is ideal. You’ll have plenty of room to crispy up the skin with the air crisp function.
I recommend having your butcher trim off excess fat and skin to help the turkey fit better in the pot. A snug fit is key for even cooking.
Brining is a Must for Flavor and Moisture
While optional, I highly suggest brining your turkey before cooking. This process infuses the meat with flavors and keeps it incredibly moist.
The Pioneer Woman’s apple cider turkey brine is my personal favorite. To make brining easy, use the Ninja Foodi pot to boil the brine liquid. Then cool it down fully before submerging the raw turkey for 16-24 hours.
If you skip brining, I recommend injecting the turkey with a flavored butter to boost moisture.
Calculate the Perfect Cook Time
Determining the pressure cook time for a turkey in the Ninja Foodi is straightforward:
- Take the turkey’s weight in pounds
- Multiply by 2
- Subtract 1 from the result
The number you get is the pressure cook time in minutes.
For example, a 10 lb turkey would cook for 19 minutes (10 x 2 – 1 = 19). This formula works like a charm to prevent over or undercooking.
Step-By-Step Cooking Directions
Now let’s get down to the nitty gritty of how to cook a turkey in a Ninja Foodi:
-
Remove giblets and rinse turkey: Check the cavities and remove any giblets or neck. Give the turkey a thorough rinse under cold water and pat dry with paper towels.
-
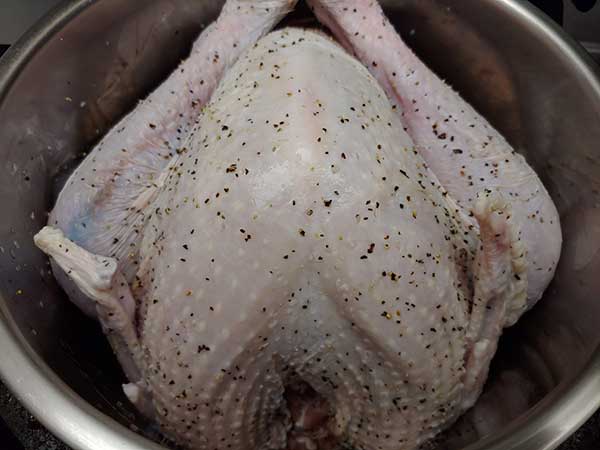
Season the skin: For crispy skin, it’s important to thoroughly coat the skin with oil and seasonings. I love using a mixture of olive oil, salt, pepper, sage, thyme, and rosemary. Rub it all over.
-
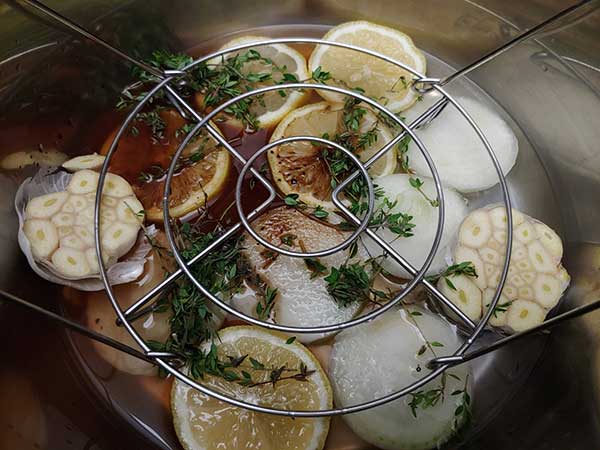
Add liquid to pot: Pour 1/2 cup water or chicken broth into the pot. This will help the turkey cook evenly.
-
Insert turkey: Place the seasoned turkey breast-side up on a sling or trivet inside the pot.
-
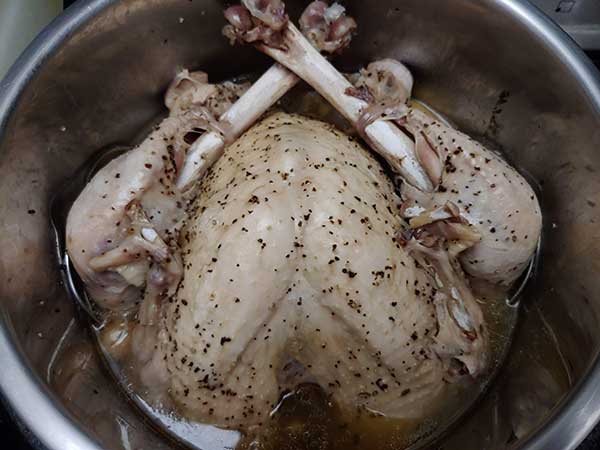
Pressure cook: Close the lid, seal the release valve, and pressure cook for the calculated time based on turkey’s weight.
-
Natural release: Let the pressure come down naturally for 15 minutes before manually releasing the rest.
-
Air crisp skin: Remove turkey and discard liquid. Coat skin with oil spray. Air crisp at 400°F for 5-10 minutes to achieve crispy skin.
-
Check temp and rest: Turkey is safe to eat once the thickest part of the breast reaches 165°F. Let rest 15 minutes before carving.
It’s that easy! The Ninja Foodi does all the hard work for tender, juicy meat and perfect crispy skin.
Helpful Hacks for Turkey Success
Here are some additional tips and tricks I’ve picked up for getting the best results:
-
Use an oven-safe meat thermometer to monitor the temp without opening the pot.
-
Baste the turkey with broth during the natural release for added moisture and flavor.
-
Add aromatics like onion, garlic, and herbs to the pot for delicious turkey stock.
-
Refrigerate or freeze the turkey stock to use in other recipes.
-
If there’s room, add cubed potatoes and carrots to cook along with the turkey.
-
Brush thawed frozen butter over the skin before air crisping for ultimate crispness.
-
Carve the turkey on a large cutting board to catch all the juices for making gravy.
Get Creative with Seasonings and Sides
Plain old salt and pepper turkey is so blah. With the Ninja Foodi, it’s easy to jazz up the flavors. After brining, try different rubs using herbs, spices, citrus, or dried fruit.
You can even cook flavorful side dishes right along with the turkey. Potatoes, sweet potatoes, stuffing, and vegetables all do great under pressure. Just add 5-10 minutes to the turkey cook time.
With the Ninja Foodi, your Thanksgiving meal can have explosive flavors and come together with minimal effort. This foolproof turkey recipe takes the stress out of holiday cooking so you can relax and enjoy time with your loved ones.
What tips or tricks do you have for cooking turkey in the Ninja Foodi? I’d love to hear how it works for you!

Why This Recipe Works
- When cooking in the Instant Pot
, there is no need to brine your turkey. The steam pressure during cooking, along with the aromatics in the pot, result in a tender, moist and flavorful turkey without the step of brining.
- The Duo Crisps
or Mealthy CrispLid
to air fry. Another option is the Ninja Foodi
, which is similar to the Instant Pot Duo Crisp.
- From start to finish, the turkey is ready in under two hours!
 , there is no need to brine your turkey. The steam pressure during cooking, along with the aromatics in the pot, result in a tender, moist and flavorful turkey without the step of brining.
 or
or  to air fry. Another option is the
  , which is similar to the Instant Pot Duo Crisp.
How to Make an Instant Pot Whole Turkey

How to cook a Turkey in the Ninja Foodi Pressure Cooker & Air Crisper
FAQ
Can I cook a whole turkey in Ninja Foodi?
What is the roast setting on Ninja Foodi?
How do you cook a frozen Butterball turkey breast in a Ninja Foodi?
How to cook a turkey breast in a Ninja Foodi possiblecooker pro?