Follow this step-by-step tutorial and learn how to draw a cute turkey for Thanksgiving. Use markers, colored pencils or watercolors to complete your finished turkey. These would make adorable place cards on a Thanksgiving table or cute decoration to attach to Thanksgiving hostess gifts.
If you’ve never drawn a turkey before, it’s actually really easy. These step by step drawing instructions are easy enough for kids to do! But it’s also a great design for adults to learn too, especially if you want to add some handmade doodles to your Thanksgiving decorating.
You can also follow the second tutorial on this post to find out how to turn your turkey into a beautiful watercolor painting. It’s so easy!
Drawing a turkey may seem challenging, but with some basic sketching techniques and an understanding of turkey anatomy anyone can create a fun turkey illustration. As a beginner artist I have found that breaking down a complex subject like a turkey into simple shapes and steps helps me tackle a drawing that previously seemed daunting.
In this article, I’ll walk you through a simple, step-by-step method for drawing an cute cartoon turkey. With a bit of patience and practice, you’ll be amazed at the turkey drawing you can create.
Supplies You’ll Need
- Drawing paper – any blank white printer paper or a sketchpad will do
- Pencil – #2 pencil or drawing pencils like 4B or 6B
- Eraser – a kneaded eraser is best for lifting graphite cleanly
- Coloring supplies (optional) – crayons, colored pencils, markers or paints for coloring your finished turkey
Step 1: Draw a Large Oval for the Body
- Lightly sketch a large oval shape near the middle of your paper. This will be the basic framework for your turkey’s oval body.
- Make sure to leave enough room at the top, bottom and sides for the head, feet and tail feathers later on.
Step 2: Add a Smaller Oval for the Head
- Draw a smaller oval shape above the body oval, overlapping it slightly.
- This will form the basic shape of the turkey’s head. Add a diagonal line under the head for the turkey’s beak.
Step 3: Sketch the Neck & Facial Features
- Draw a diagonal curved line connecting the body to the back of the head to form the neck.
- Add small circles for eyes and another curved line for the mouth. You can also sketch some lines around the beak for the turkey’s wattle if you like.
Step 4: Draw the Legs & Feet
- On each side of the body oval, sketch two long, thin ovals for the legs.
- At the bottom of each leg, draw a sideways letter C shape for the feet. Add a few curved bumps on each foot for the toes.
Step 5: Add the Tail Feathers
- At the back of the body, draw a fan-like cluster of long, feather-shaped curves spreading up and out to represent the turkey’s tail feathers.
- You can add as many tail feathers as you like – turkeys have quite a magnificent plumage!
Step 6: Finish the Details
- Go back in and reinforce your initial sketch lines, darkening them to finish off your turkey illustration.
- Add some details like feathers along the belly, scalloping on the tail feathers and lines on the legs and feet for texture.
Step 7: Color Your Turkey (Optional)
- If desired, use crayons, colored pencils, markers or paint to color your turkey drawing.
- Try using browns, oranges, yellows, greens, blues and purples for a vibrant, life-like turkey coloring. Don’t forget to add color to the wattle, beak, eyes and feet too.
And there you have it – a cute cartoon turkey drawing! With some basic shapes and a little coloring, you can create a fun illustration perfect for Thanksgiving arts and crafts Once you get comfortable with this beginner method, try drawing turkeys in different poses like side profiles, turkeys with full spread tails, or even a scene with multiple turkeys.
Here are a few tips to keep in mind for your next turkey drawing:
Focus on Simple Shapes
Circles, ovals, curved lines and angles are the basic building blocks for drawing turkeys and many other animals. Master these fundamental shapes and you’ll be able to draw a turkey’s body, head, beak and tail configuration more easily.
Pay Attention to Turkey Anatomy
Study photos and illustrations of real turkeys to note key anatomical features like the wattle snood fan-shaped tail and feather patterning. Observing these real turkey qualities will lend more lifelike detail to your cartoony drawing.
Practice Makes Perfect
Drawing is a skill that improves with repetition and critique. Even professional artists had to start somewhere. Don’t get discouraged – the more turkeys you sketch, the better your drawings will become.
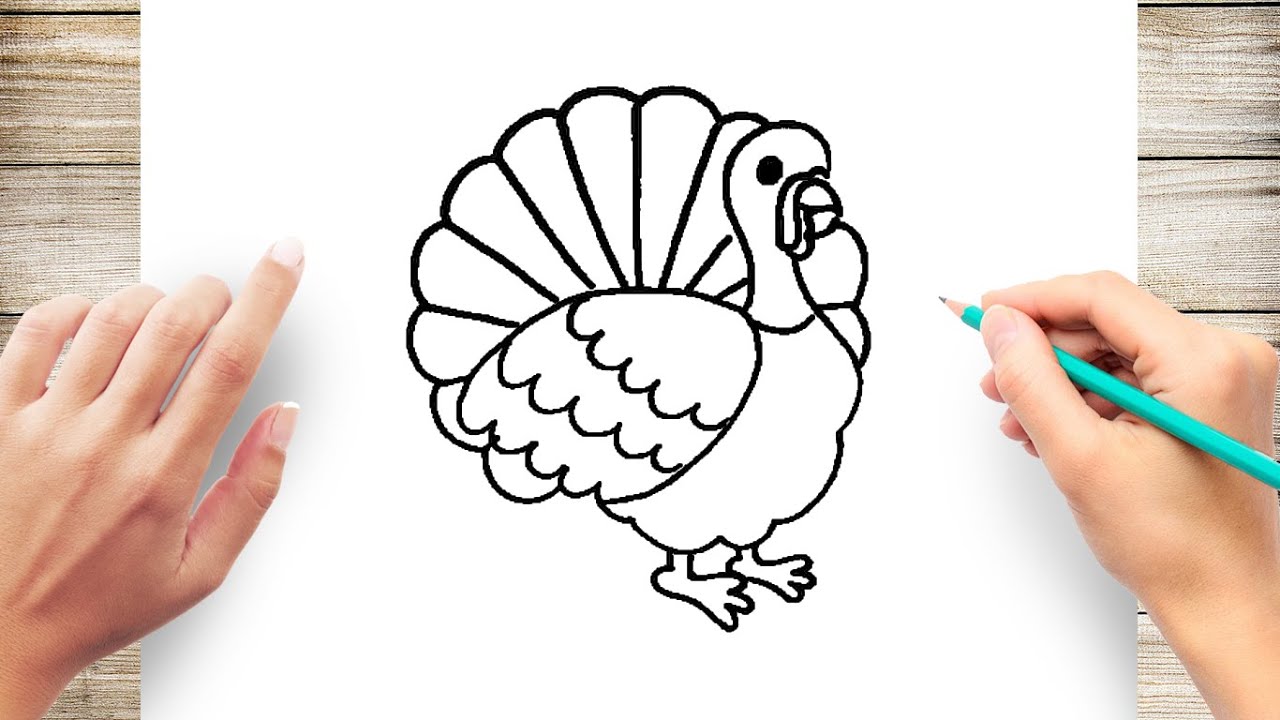
Step by Step Instructions To Learn How to Draw a Cute Turkey
Draw the basic turkey shape.
Add your turkey’s face.
Add details to the body and wings.
Add details to the feathers.
How To Draw A Funny Turkey
How do you draw a Turkey with curved lines?
Add two curved lines that make a pointed angle on the head for the beak. Sketch two lines with an angle attached to the body. Draw a triangle on the ends of each line for the turkey’s legs. Draw a fan-like structure on the rear part of the turkey. Draw the eyes using small circles. Add a curved line line for the eyebrows.
How do you draw a Turkey’s vitals?
A turkey’s appearance changes significantly at full strut and can make pinpointing their vitals a challenge. A general rule is to draw a vertical line just in front of the bird’s legs.
How do you draw a turkey wing?
As you are coming down past the beak, join it in a smooth line to the chest oval. Draw the lower part of the chest with small scallops to suggest the feathers. Draw the turkey’s wing next. Round of the sharp corner at the shoulder, and outline the upper and lower edge. Then draw the feathers at the end of the wing that overlap each other.
How do you draw a Turkey squiggle?
Draw a triangle in the center of the top of your squash. Draw two circles slightly above the triangle. Draw two, darker circles inside of the circles already drawn. Draw a squiggle-line extending from the triangle. Draw elongated ovals extended from the squash, until it resembles a fan. Draw two, even lines extending from the bottom of the turkey.