Every year, for the past 16 years, we’ve deep-fried a turkey for Thanksgiving. It took a near-accident around year 2 for us to realize that there must be a better way than to dangerously heat up 6 gallons of cooking oil on my front porch!
Cooking a perfect turkey can be intimidating, but using an electric oil-less turkey fryer makes it easy and foolproof. An oil-less fryer uses infrared heat to cook the turkey from the outside in, resulting in a beautifully browned, crispy skin enveloping tender, juicy meat.
In this comprehensive guide, I’ll walk you through everything you need to know to cook a mouthwatering turkey in an electric oil-less fryer, from thawing and preparing the bird to operating the fryer for optimal results. Whether you’re a first-time turkey cooker or a seasoned pro, you’ll find tips and tricks to help you nail Thanksgiving dinner!
Benefits of Using an Oil-Less Fryer
Traditional deep frying delivers deliciously crispy turkey, but requires dealing with multiple gallons of dangerously hot oil. An oil-less fryer provides the same crispy end result, no oil required. Here are some of the biggest benefits of using an electric oil-less fryer:
-
Safety: No giant pot of boiling oil eliminates the burn risks and potential for destructive oil fires.
-
Convenience A compact, self-contained unit is much easier to setup and use than messy outdoor propane fryers. Just plug it in and go!
-
Healthier: Oil-less frying removes excess fat for a healthier end product than deep frying.
-
Versatility: Oil-less fryers can be used year-round for foods beyond just turkey. Try chicken, roasts, and more!
-
Easy Cleanup: With no oil, cleanup is a breeze compared to scrubbing burnt oil residue.
Picking the Right Turkey
When selecting a turkey for oil-less frying, keep these tips in mind:
-
Weight: Stick to turkeys under 16 pounds, as heavier birds won’t cook evenly. 10-14 pounds is ideal.
-
Shape: Compact, rounded bodies work better than oddly shaped or very large-breasted birds.
-
Thawing: Always thaw turkey completely in the fridge before frying, allowing 24+ hours for every 4-5 pounds.
-
Brining: For the juiciest meat, brine thawed turkey in a saltwater solution for 8-12 hours prior to cooking.
Seasoning Your Bird
With the skin becoming ultra crispy, oil-less fried turkey doesn’t need heavy basting or injected flavoring. Simple dry seasoning rubbed directly on the skin provides plenty of flavor.
-
Coat the turkey generously inside and out with kosher salt and black pepper.
-
For extra flavor, use an all-purpose poultry seasoning or spice rub. Cajun seasoning gives a bold kick.
-
Herbed butters or citrus zest tucked under the skin infuse additional aroma.
-
Resist over-seasoning with sugar or maple syrup, as excess sweetness may burn.
Operating Your Oil-Less Turkey Fryer
Follow these steps when using your electric oil-less turkey fryer:
-
Remove any neck or giblets from the cavity. Rinse turkey and pat very dry, inside and out.
-
Truss legs together with cooking twine to maintain shape. Tuck wing tips under.
-
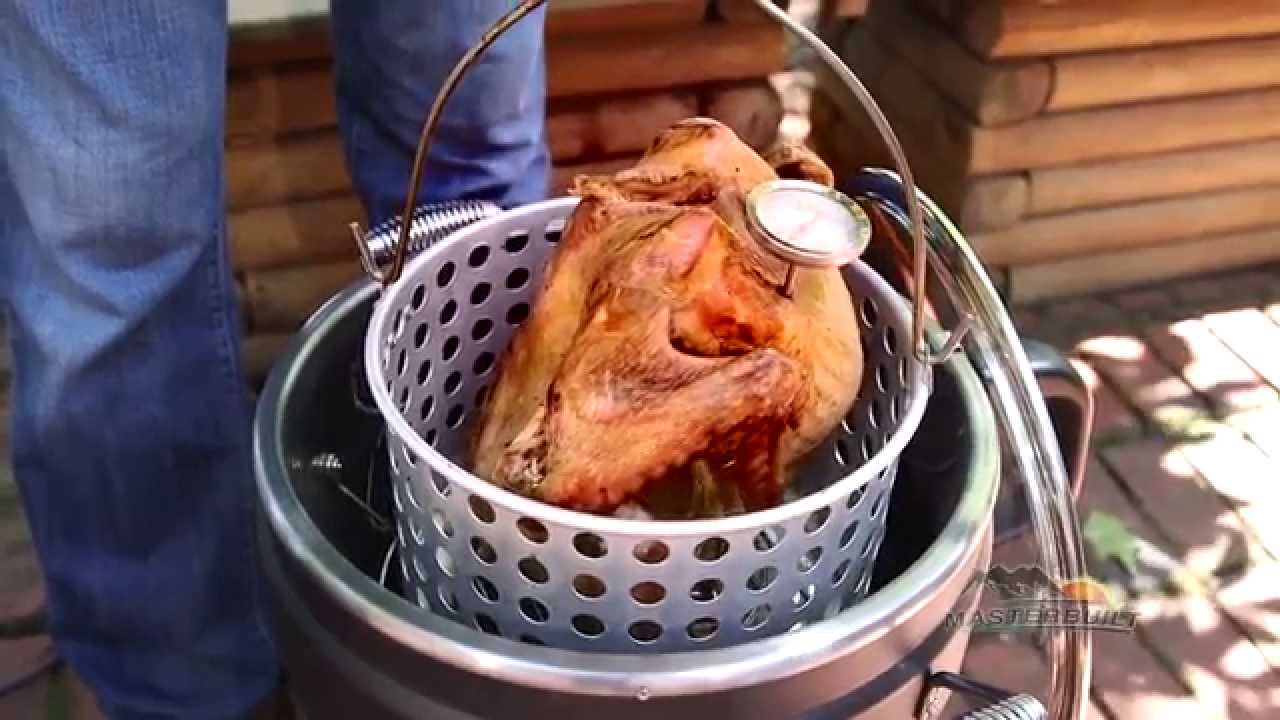
Place turkey breast-side up in fryer basket. Insert a meat thermometer into the thickest part of breast, being careful wire doesn’t touch bone.
-
Set basket into fryer, cover, and set dial to turkey/poultry setting. For a 12 lb turkey, cook time is generally 60-70 minutes.
-
Allow turkey to rest 20+ minutes before carving for juiciest results. The internal temperature will continue rising 5-10°F during rest.
-
Use drippings in fryer tray to make flavorful gravy.
Oil-Less Fryer Tips and Tricks
Follow these tips to get the best results from your oil-less turkey fryer:
-
Properly preheat the empty fryer 5-10 minutes before cooking. This prevents drying out the turkey.
-
Don’t overfill the fryer basket. Allow ample air circulation for even cooking.
-
Use a thermometer to verify turkey reaches 165°F minimum internal temperature in breast and thighs.
-
Let turkey rest before carving. The meat needs time to re-absorb juices for tenderness.
-
Foil tenting is unnecessary. The fryer’s radiant heat eliminates oven-like drying of the skin.
-
Frying smaller 8-10 lb turkeys cooks faster. Reduce time 10 minutes per pound as a guide.
-
Add smoker pellets to fryer’s chip box for extra smoky flavor (not overpowering).
-
Clean fryer thoroughly after each use. Burnt food debris affects performance.
Troubleshooting Oil-Less Turkey
Having issues with your fried turkey? Here are some common problems and solutions:
Undercooked: The turkey is too large for even cooking. Stick to turkeys under 16 lbs. Also allow full thawing time.
Overcooked: Cooking temp is too high or time was too long. Follow size guidelines and cook 10-12 minutes per pound.
Not Crispy: Ensure turkey is patted very dry before cooking. Also don’t overfill fryer basket – allow airflow.
Bland Flavor: Brine and properly season turkey. Place citrus, herbs or butter directly under skin before cooking.
Smoking/Burning: Remove any residual oil coating new fryers. Don’t exceed recommended turkey size.
Uneven Cooking: Properly thaw flat on bottom of fridge, and cook breast up for even heating.
Enjoy Your Fabulous Fried Bird!
Cooking turkey in an electric oil-less fryer eliminates the hassles of deep frying for a safer, healthier holiday feast. Follow these tips for crispy browned skin enveloping tender, juicy meat.
PROS of the Char-Broil Big Easy Oil-Less Turkey Fryer
This machine is an infrared fryer, and is powered by a propane tank, the one from your BBQ grill will work just fine.
The 16,000 BTU burner produces heat that circulates in the chamber surrounding the turkey, so that turkey cooks evenly. Okay, so to be fair, this technically, this isn’t “deep frying” a turkey, but the results are nearly identical to deep fried turkey: moist, juicy meat (even the breast!) and a crispy skin that is impossible to replicate in the oven.
Here’s what we like about the Char-Broil Big Easy:
- No oil needed. Previously, when deep-frying a turkey, not only did we have to buy 5 gallons of cooking oil, but we needed to discard of 5 gallons of used cooking oil afterwards. No oil is needed with the Char-Broil.
- Compared to oven-roasting, using the Big Easy saves us so much time. Oven: 4 hours Big Easy: 2 hours (10 minutes per pound).
- Fast heat up and cool down time: 60 seconds to heat up and the machine is already cool by the time dinner is over. In contrast to deep-frying with oil, you’d have to wait several hours for the oil to cool down completely.
- Drippings are collected in a small container. With deep-frying in oil, no drippings.
- Safe to use – No worries about tipping over or oil splattering (which has happened to us!)
- Relatively inexpensive, worth the $99 investment for perfect deep fried turkey without oil, every year.
A Better Way to Ensure Juicy Turkey Without Brining
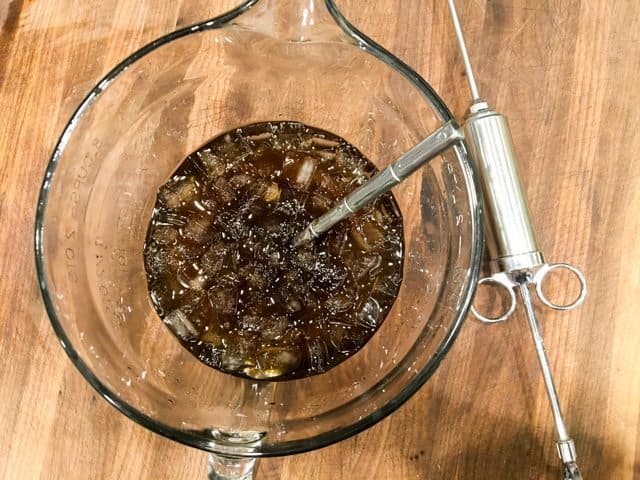
If you are making deep fried turkey without oil, a better way to create the most juicy and tender meat (and at same time, crispy skin), is to inject the turkey with the brine/marinade solution. Injecting deep into the meat of the turkey keeps the water AWAY from the skin.
We make a solution of water, salt, maple syrup, and just a splash of liquid smoke.
Whisk together until the salt dissolves:
1 cup hot water 1/4 cup kosher salt 2 tablespoons maple syrup 1 1/2 teaspoons liquid smoke
Then add in 1/2 cup of ice to cool the mixture down (and make it safe to inject into the turkey)
Butterball Oil Free Turkey Fryer: Features and Results
FAQ
What size turkey will fit in an oil less fryer?
How do you cook a turkey in a Masterbuilt electric fryer?