Turkey necks are an underrated cut of meat that can make a delicious addition to soups, stews, beans, and greens when properly prepared. But if you’re new to cooking turkey necks, you may be wondering – how long do you boil turkey necks on the stove? Follow this guide for tips on achieving tender, fall-off-the-bone turkey necks every time.
Turkey necks are brimming with collagen and rich flavor. Slow cooking via boiling helps break down the collagen into gelatin, resulting in succulent meat that practically melts in your mouth. The flavored broth left behind after boiling is also a wonderful base for gravies sauces, soups, and more.
However, turkey necks do require prolonged cooking times to become tender Boiling them on the stovetop allows you to monitor the pot easily and ensure they reach the desired consistency
How Long Should Turkey Necks Boil on the Stove?
Most recipes call for boiling turkey necks on the stove for 1-2 hours. However, cook time can vary based on:
-
Size of the necks – Larger necks may take longer to become tender Cut them into smaller pieces to reduce cook time
-
Amount of necks – The more necks in the pot, the longer it will take them to fully cook through.
-
Personal preference – Some people prefer their turkey necks extremely soft and tender, requiring a longer boil.
-
Altitude – At higher altitudes water boils at a lower temperature, increasing cook times.
Step-by-Step Guide to Boiling Turkey Necks on the Stovetop
Follow these simple steps for foolproof boiled turkey necks every time:
Ingredients:
- 3-4 lbs turkey necks
- Water to cover necks by 2 inches
- Aromatics like onion, celery, garlic, bay leaves (optional)
- Seasonings like salt, pepper, poultry seasoning
Directions:
- Rinse turkey necks under cool running water and pat dry. Cut off any excess fat or skin.
- Place necks in a large pot and cover with cold water by 2 inches.
- Bring to a boil over high heat, then reduce to a gentle simmer. Skim off any foam that rises to the surface.
- Add aromatics and seasonings to the pot. Cover and simmer for 1-2 hours, until necks are very tender.
- Use tongs to transfer necks to a plate. Allow to cool slightly before handling.
- Strain and reserve cooking liquid for another use. Enjoy necks right away or refrigerate leftovers.
Tips:
- Check tenderness after 1 hour. Cook longer if needed.
- Add more water if levels get low to keep necks fully submerged.
- Cut necks into smaller pieces prior to boiling to reduce cook time.
How to Tell When Turkey Necks Are Fully Cooked
It can be tricky to tell when turkey necks are done since they contain a lot of collagen and connective tissue. Here are some ways to test for doneness:
- The meat should start easily separating from the bone.
- A fork or knife should slide in and out of the meat with no resistance.
- The necks should feel very tender when poked with a fork or squeezed with tongs.
- Cut into a piece of neck meat to check the internal color – it should not be pink.
When in doubt, boil necks for the full 2 hours for maximum tenderness. Slightly overcooked is better than undercooked when dealing with this tough cut.
Serving and Storing Boiled Turkey Necks
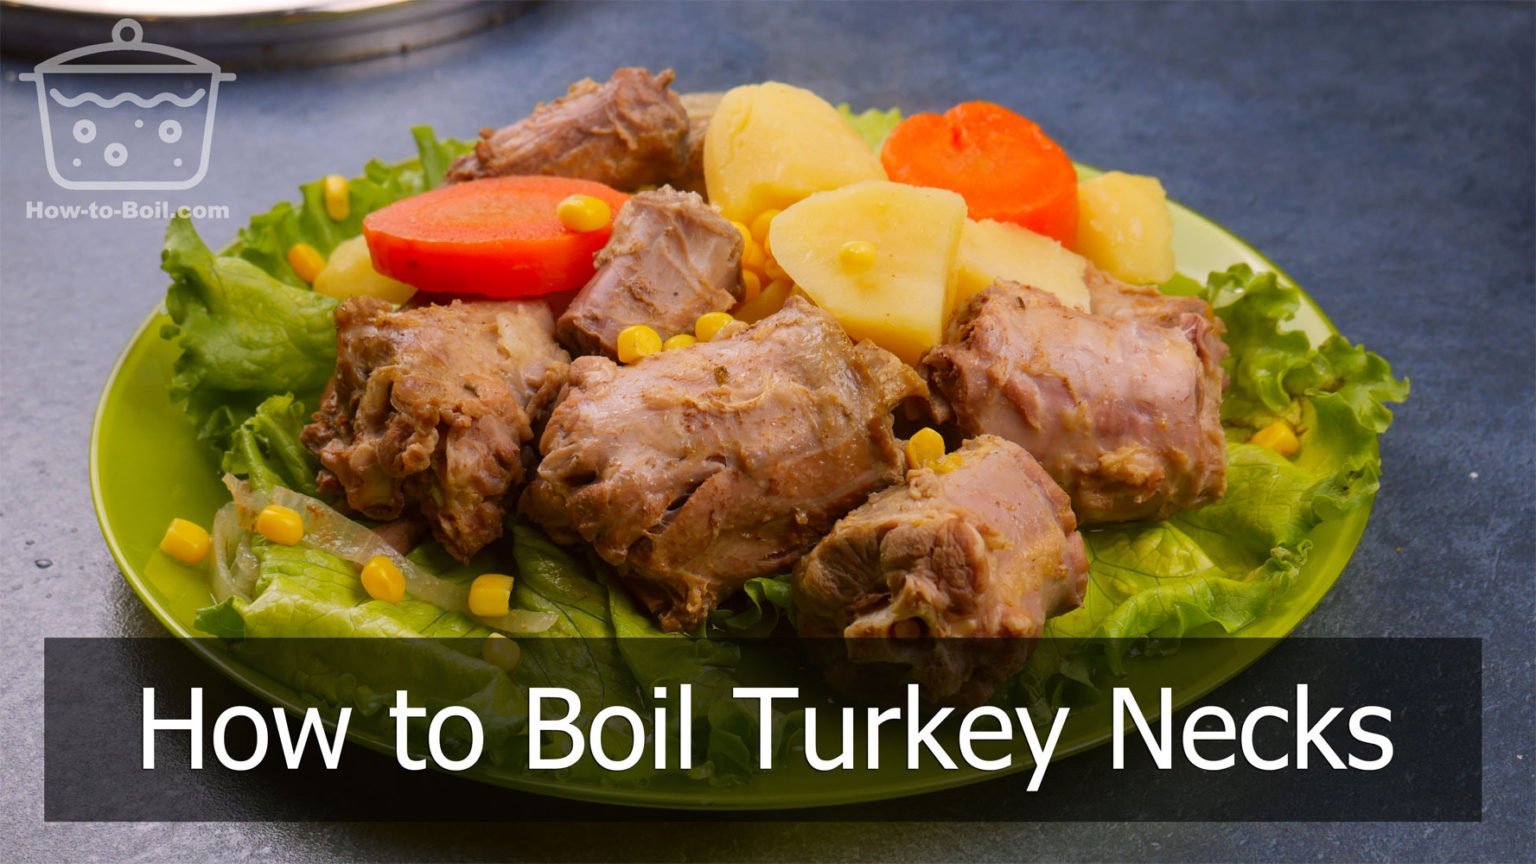
Once boiled until tender, turkey necks can be used right away in soups, stews, beans, over rice or grits, or just enjoyed on their own. Refrigerate leftovers for up to 4 days. The flavorful cooking liquid can be strained and frozen for future use in recipes.
So next time you come across turkey necks at the store, don’t be intimidated. Now you know how to transform these underappreciated pieces into tender, succulent meat with the simple boiling method. Just allow 1-2 hours for boiling on the stovetop, and you’ll have delicious turkey necks ready to enjoy.
Why Choose Turkey Necks?
Turkey necks are an excellent choice for those who enjoy rich, succulent, and tender meat. Packed with flavor and collagen, these parts are ideal for creating delicious soups, stews, or even as a standalone dish. Boiling is a simple yet effective method to extract all the goodness from these turkey necks.
To successfully boil turkey necks, gather the following ingredients and equipment:
- 3 to 4 turkey necks
- 8 cups of water
- 1 onion, roughly chopped
- 2 carrots, sliced
- 2 celery stalks, chopped
- 3 cloves of garlic, minced
- 1 bay leaf
- 1 teaspoon of salt
- 1 teaspoon of black pepper
- A large pot
- A stove or induction cooker
Now that you have your ingredients and equipment ready, let’s start boiling those turkey necks:
- Clean the turkey necks thoroughly under running water to remove any impurities.
- In a large pot, add the water and bring it to a boil over medium-high heat.
- Add the turkey necks to the boiling water and let them cook for 5 minutes.
- Skim off any foam or impurities that rise to the surface of the water using a spoon.
- Add the chopped onion, sliced carrots, chopped celery, minced garlic, bay leaf, salt, and black pepper to the pot.
- Reduce the heat to low and let the mixture simmer for 2 to 3 hours.
- Occasionally check the pot, adjusting the heat if necessary to maintain a gentle simmer.
- After the cooking time is complete, remove the pot from the heat and let it cool slightly.
- Using tongs or a slotted spoon, remove the turkey necks from the pot and transfer them to a plate.
- Once the turkey necks have cooled, they are ready to be enjoyed in various dishes or on their own.
Getting Creative with Turkey Necks
Boiled turkey necks are incredibly versatile and can be used in a multitude of recipes. Here are some delicious ideas to make the most of your turkey necks:
- Add the boiled turkey necks to your favorite soup or stew for an extra burst of flavor.
- Shred the meat from the necks and use it as a filling for tacos or sandwiches.
- Create a rich and hearty turkey neck gravy to serve over mashed potatoes or rice.
- Use the boiled necks to make a flavorful turkey stock, perfect for enhancing the taste of your homemade gravies and sauces.
Boiling turkey necks is a fantastic way to extract the delicious flavor and collagen these often underrated parts offer. With just a few simple steps, you can elevate your dishes and create a memorable culinary experience. So don’t let those turkey necks go to waste – grab them and start boiling for a delectable treat that will leave your taste buds wanting more! Have experience boiling turkey necks? Share your tips and techniques with fellow cooks in the
How to make New Orleans boiled Turkey Necks (Stove top version)
Can You boil turkey necks on the stove?
Boiling turkey necks on the stove is an easy process. Start by seasoning a large pot of water. The amount of water you use will be dependent upon the number of turkey necks you plan to boil. Use enough water so that it covers the turkey necks completely and then some. Add any vegetables you plan to use to the water.
How long does it take to cook a turkey neck?
Use enough water so that it covers the turkey necks completely and then some. Add any vegetables you plan to use to the water. This can include potatoes, carrots, onions, bell peppers, and more. Boil your turkey necks until they are cooked and tender. This can take anywhere from 1-2 hours, depending on your preference.
How long does Turkey Neck take to boil?
Turkey necks take at least 2 hours to boil. Longer simmering times, up to 3 or 4 hours, can result in more tender and flavorful meat. Check for doneness after the first hour and a half by testing the meat’s tenderness. When they’re ready, they should be fork-tender (turkey meat pulling away from the bones).
How much water do you need to boil a turkey neck?
The amount of water you use will be dependent upon the number of turkey necks you plan to boil. Use enough water so that it covers the turkey necks completely and then some. Add any vegetables you plan to use to the water. This can include potatoes, carrots, onions, bell peppers, and more. Boil your turkey necks until they are cooked and tender.