As a home cook who loves preparing delicious holiday meals, I often rely on my trusty turkey baster to help make juicy, flavorful dishes. However, like any frequently used kitchen tool, my baster needs regular cleaning to keep it in optimal condition. After years of trial and error, I’ve discovered the best practices for cleaning a turkey baster and keeping it ready for action. In this comprehensive guide, I’ll share everything I’ve learned so you can keep your baster looking and functioning like new.
Why Proper Cleaning is Essential
While it may seem like an insignificant kitchen accessory keeping your turkey baster sparkling clean is crucial for several reasons
-
Maintaining flavor integrity Even small amounts of residue from previous uses can taint the taste of whatever liquid you’re drawing up next A clean baster ensures your dishes have their intended flavors.
-
Preventing cross-contamination: Improperly cleaned equipment can spread bacteria and contaminants to your food. A thorough cleaning kills germs and keeps everyone safe.
-
Extending its lifespan: Like all kitchen tools, routine cleaning keeps your baster functioning optimally for years to come, saving you money on replacements.
-
Restoring suction power: Grease buildup inhibits the baster’s suction strength. Proper cleaning clears blockages for powerful suction.
Step-by-Step Guide to Deep Cleaning Your Baster
Cleaning your turkey baster is simple with the right techniques. Here is my tried-and-true process in six easy steps:
1. Disassemble the baster
Most basters separate into at least two parts – the squeeze bulb and the tubing. Take them apart to access all the surfaces.
2. Wash with hot, soapy water
Use a mild dish soap and hot water to remove oils and residue. Scrub every inch with a small brush.
3. Target stubborn buildup
For stuck-on gunk, soak in hot water and vinegar for 15 minutes before scrubbing. Baking soda also lifts grease.
4. Sanitize with bleach or lemon juice
Kill bacteria by soaking for 5 minutes in a bleach solution or lemon juice. Rinse thoroughly.
5. Dry completely
Let all parts air dry to prevent mold or bacteria from growing.
6. Reassemble and store properly
Once dry, put the baster back together and keep it in a clean, dry spot until the next use.
Handy Cleaning Tools and Agents
Having the right cleaning tools and agents on hand makes washing your turkey baster quick and easy:
-
Small brush: Use a specialized baster brush or bottle brush to scrub inside.
-
Dish soap: Look for a mild formula that won’t damage materials.
-
Baking soda: Its abrasive texture lifts stuck-on gunk. Make a paste with water.
-
Vinegar: The acetic acid in vinegar cuts grease and disinfects.
-
Lemon juice: A natural antibacterial agent that deodorizes.
-
Bleach solution: 1 tablespoon bleach per quart of water sanitizes.
Tackling Stubborn Residue
Sometimes basters get really gunky. Here are my best tips for conquering stubborn residue:
-
Soak in hot, soapy water for 30 minutes before scrubbing.
-
Use a soft-bristle toothbrush to dislodge stuck-on food.
-
Sprinkle with baking soda and scrub with a sponge. Rinse well.
-
Fill with undiluted vinegar and let sit for 1 hour before rinsing.
-
For slimy buildup, soak in a bleach solution for 10 minutes then scrub.
Storing Your Turkey Baster Between Uses
Proper storage preserves your baster’s cleaning efforts:
-
Let the baster fully air dry after washing. Trapped moisture breeds bacteria.
-
Keep disassembled in a clean, dry spot like a utensil drawer.
-
Never nest together wet basters or store near food.
-
Avoid plastic bags which can trap moisture and odors.
-
Consider hanging on a pot rack for full air circulation.
Special Considerations for Different Baster Materials
Not all basters are created equal when it comes to cleaning. Here’s how to care for different materials:
Plastic: Go for low water temperatures and mild soap to avoid warping. Avoid abrasives.
Glass: Use medium-hot water and scrub gently to prevent cracking. Dishwasher safe.
Silicone: Can handle very hot water and vigorous scrubbing. Stain resistant.
Stainless steel: Needs non-abrasives like vinegar or lemon juice to avoid scratching.
Rubber bulbs: Don’t withstand high heat. Wash gently and replace frequently.
Cleaning After Specific Uses
Certain cooking liquids require extra cleaning effort:
Frying oil: Hot, soapy water removes grease. Rinse and dry thoroughly after.
Marinades: Can leave sticky residue. Soak in vinegar solution then scrub.
Glazes and sauces: Fill with hot water and dish soap after use to prevent buildup.
Raw poultry juices: Wash with hot, soapy water then soak in bleach solution to kill bacteria. Rinse thoroughly.
Boiled syrups: Avoid dried-on sugary residue by immediately rinsing with hot water after use.
5 Myths About Cleaning Turkey Basters
Don’t believe everything you hear – some cleaning “tips” can actually damage your baster! Here are 5 myths busted:
Myth: Basters are always dishwasher safe.
Fact: High heat can warp plastic bulbs and tubing. Check manufacturer guidelines.
Myth: Soaking in boiling water sanitizes.
Fact: Boiling can destroy rubber bulbs and plastic parts. Use bleach or lemon juice instead.
Myth: Scouring powders remove tough gunk.
Fact: They scratch surfaces, creating more places for gunk to cling. Avoid abrasives.
Myth: Bleach solution ruins basters.
Fact: When diluted properly, it’s an effective sanitizer and won’t harm materials.
Myth: Air drying isn’t necessary.
Fact: Trapped moisture damages basters. Always let parts fully air dry after washing.
Maintaining Your Turkey Baster for Optimal Performance
With regular TLC, your turkey baster can continue performing for years. Here are my top maintenance tips:
-
Inspect for cracks in bulbs or tubing before each use. Replace if damaged.
-
Test suction before each use. Replace bulb if suction weakens over time.
-
Lubricate rubber bulbs occasionally with food-grade oil to maintain flexibility.
-
Keep extra clean bulbs and tubing on hand for quick replacements as needed.
-
Consider buying a new baster each year since they’re inexpensive and wear out.
-
Hand wash gently – abrasive scouring and high heat deteriorates materials over time.
Become a Turkey Baster Cleaning Pro!
Parts and accessories for turkey basters
Most turkey basters are only two pieces, the bulb and the tube. The bulb detaches from the tube so that the insides of both can be gotten at for cleaning.
Some come with more than just two pieces. Some of these, such as one model from OXO good grips, have a two-piece bulb. User reviews on basters with more than two pieces have been decidedly mixed, with some people saying they are overly complex.
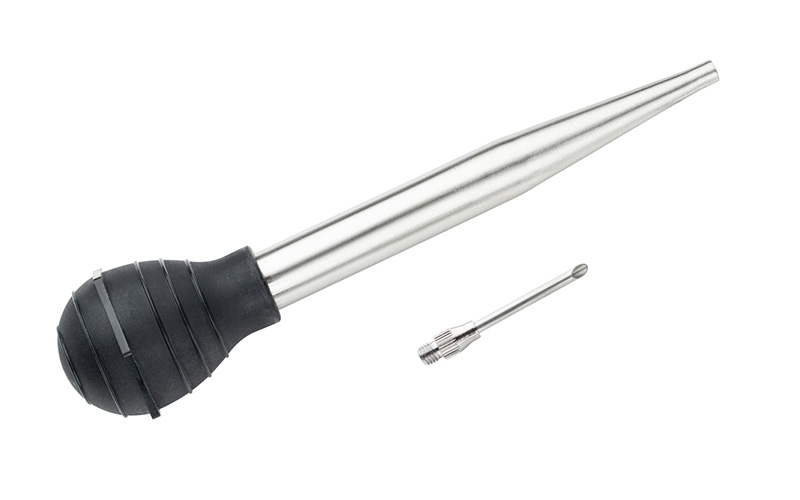
Others might have a tip that screws onto the end of the tube. The tip can be a curved plastic one to direct the flow of liquid out at an angle, or a one that looks like a small paint brush to brush the juices on, or one that acts as a “shower head” to spray the liquid out in a dispersed spray. Or, the tip might be a metal “needle” called an “injector needle”to pierce a food object and inject liquid deep into it.
It is probably best not to assume that the tip attachments are interchangeable between different makes of basters.
Owners of turkey basters whose tube is made of metal or glass can find over a few decades that the tube outlives the bulb, and sometimes ask about purchasing a replacement bulb. CooksInfo has not as of yet seen a retail source selling single replacement bulbs; another issue would be ensuring that it happened to fit your model snugly.
The design of turkey basters
The basic design is the same for almost all turkey basters. It consists of a large “rubber” bulb attached to a long tube with a tip at the other end.
The tubes can be made of glass, a metal such as stainless steel, nylon or silicone. The bulbs can be made of rubber, latex or silicone. Some bulbs are better than others as some won’t suck up much liquid, while others will cause the liquid to release out before you are ready. Some models have a “valve” in the end that helps prevent juices in the tube from exiting the tube until you have clearly indicated you want to squeeze them back out.
Some tubes such as metal ones, and some opaque plastic ones, are not transparent, which makes it hard to see how much liquid you have sucked up. The opaque plastic ones are usually cheaper and not as heat-resistant as the clear plastic ones. The upside to stainless steel is that it won’t discolour over time, it can withstand very high temperatures, and it won’t crack
While glass is transparent, it can crack or break, either through dropping or from thermal shock if it goes from cold to extreme hot grease heat suddenly.
Most models are dishwasher safe, though you should check the packaging to be sure if that is important to you. Most will say they are top-rack or cutlery tray safe.
Some models are “roll-resistant”; that means they have some feature that prevents them from rolling off the kitchen counter when you lay them down. Typically, this can mean a flat edge moulded into the bulb or attacked to some part of the tube.
The bulbs and plastic tubes have varying heat resistance, from 200 C to 315 C (400 F to 600°F). Some cheaper ones only certify a heat resistance up to 93 C (200 F).
The lengths of the tubes vary, with typical consumer ones averaging about 30 cm (12 inches), but specialty longer ones up to 45 cm (18) inches are available.
The tubes will hold varying capacities, depending on their length and width, from 45 to 90 ml (1.5 ounces to 3 ounces). Capacity volume in practice will depend a lot on the size of the bulb, which determines how much the bulb is able to suck up into the tube. Some bulbs have a larger capacity than others. You can almost never get any tube completely full. The best you’ll do is ½ to ¾ full. Poor bulbs might only be able to suck up enough liquid to get the tube ¼ full.
Some tubes have no measurement markings on them, particularly those made of metal, and cheaper ones.
Better-quality clear tubes are more likely to have measurement markings on them to help you measure how much liquid you have drawn up into the tube. The markings will be in US and in metric. It is probably best not to count on those markings as having clinical accuracy, but the accuracy should be close enough for home kitchen purposes.
When buying a baster, to see how a bulb feels, see if there’s an oven mitt nearby in the store that you can try it with to see how easy you can manage it. Make sure you get one that is dishwasher safe, if that is important to you.
How to clean a turkey baster. How to cook tofu.
FAQ
Can a turkey baster go in the dishwasher?
Why does my turkey baster keep cracking?
How do you clean a turkey cavity?
How to remove top of oxo turkey baster?
How do you clean a turkey baster?
Open a window for ventilation, and fill the turkey baster with oxygen bleach. Insert the tip of the turkey baster into the overflow pipe. Forcefully squirt the oxygen bleach into the pipe. Repeat this three to four times to cover as much of the inside of the pipe as possible.
Can you use a metal baster to cook a Turkey?
However, the cleaning brush that it comes with greatly helps in that area. This metal baster also comes with an injector tip, so you can prep your turkey by injecting it with flavorful liquids, spice infusions, melted butter, or other flavorings prior to cooking. Just remove the injector tip to use it as a standard baster.
Does a Turkey need to be basted?
While basters are traditional, there are many turkey recipes that don’t require basting. However, if basting is desired, it’s possible to use a spoon to collect the liquid and pour it over the food in a roasting pan. How often should you baste a turkey?