Turkey hunters are no different than other hunters when it comes to wanting to have a physical memento from a successful hunt. For big game hunters it might be an antler mount, elk ivories, or even a deer hoof gun rack (don’t judge). Turkey hunters are fond of big toms’ beards, spurs, and tail feathers. That’s why we put together this comprehensive guide for how to preserve a turkey fan. onX’s own Lake Pickle snapped detailed photos showing just how to take these treasured feathers from field to fully preserved. You’re Going to Need a Turkey. Find one with onx. Turky hunters use onX Hunt to find more turkeys. Try it free for 7 days.
For turkey hunters, preserving and displaying the fan of a prized tom is one of the best parts of the hunt. The colorful feathers make for a beautiful memento to commemorate the experience. While you can pay a taxidermist to mount a fan, it’s also easy and inexpensive to do it yourself.
Curing a turkey tail fan for display requires just a few supplies and following some simple steps. In this detailed guide, I’ll walk through the entire process from start to finish With just a little time and effort, you can turn your turkey tail into a stunning display piece
Supplies Needed
Here’s what you’ll need to cure and preserve a turkey fan:
- Sharp knife
- Borax powder
- T-pins or staples
- Cardboard or wooden board
- Small wire brush (optional)
Step 1: Remove the Tail
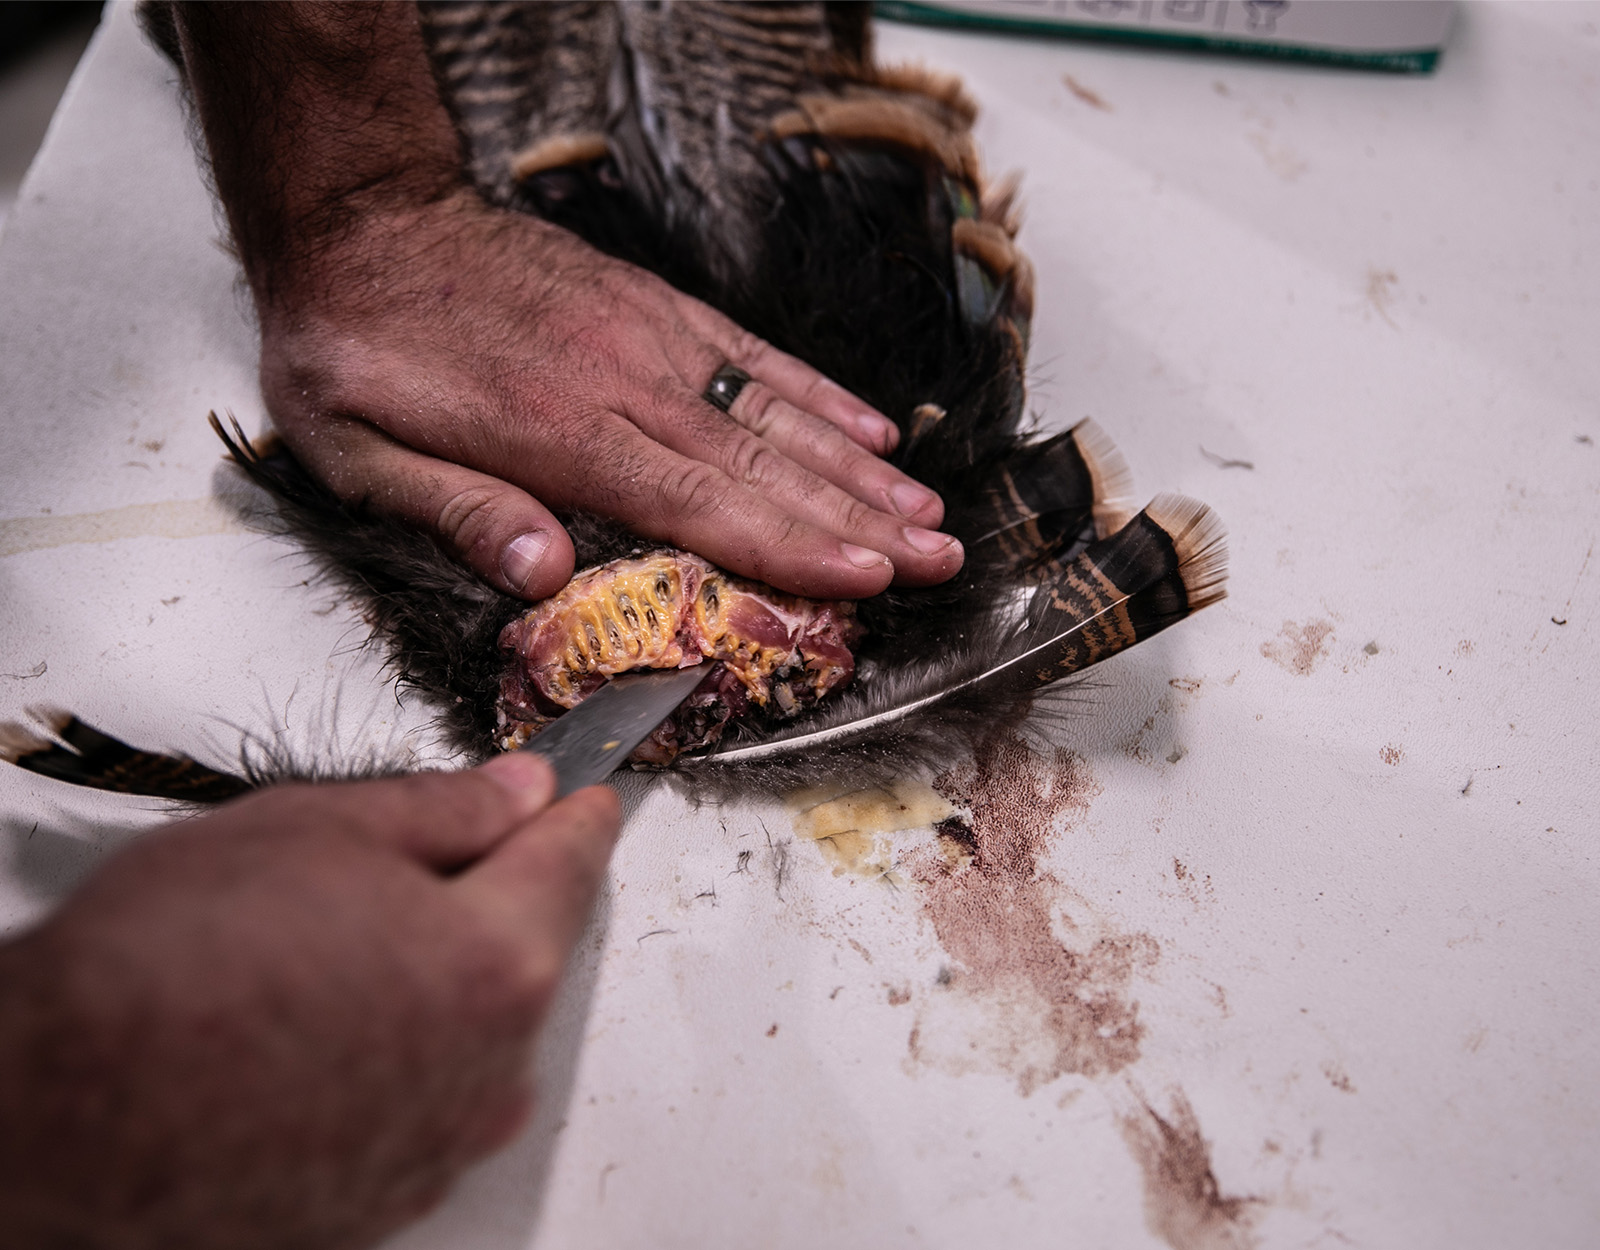
After harvesting your turkey, lay it on its stomach and locate the pope’s nose – the triangular shaped area above the vent where the tail meets the body Carefully cut through the skin and meat above the pope’s nose to detach the tail
Be sure to cut the skin without cutting any feathers. Remove any leftover fat or tissue from the base of the feathers.
Step 2: Clean the Tail (Optional)
Use a small wire brush to gently scrape any remaining fat or tissue off the base and between the quills. You can also soak the tail in Coleman fuel to degrease it, then wash with dish soap and blow dry.
Step 3: Apply Borax
Liberally apply Borax powder to the skin side of the tail base, rubbing it into the tissue. Borax absorbs moisture, preserving the skin. Apply all over including between feathers.
Step 4: Shape the Fan
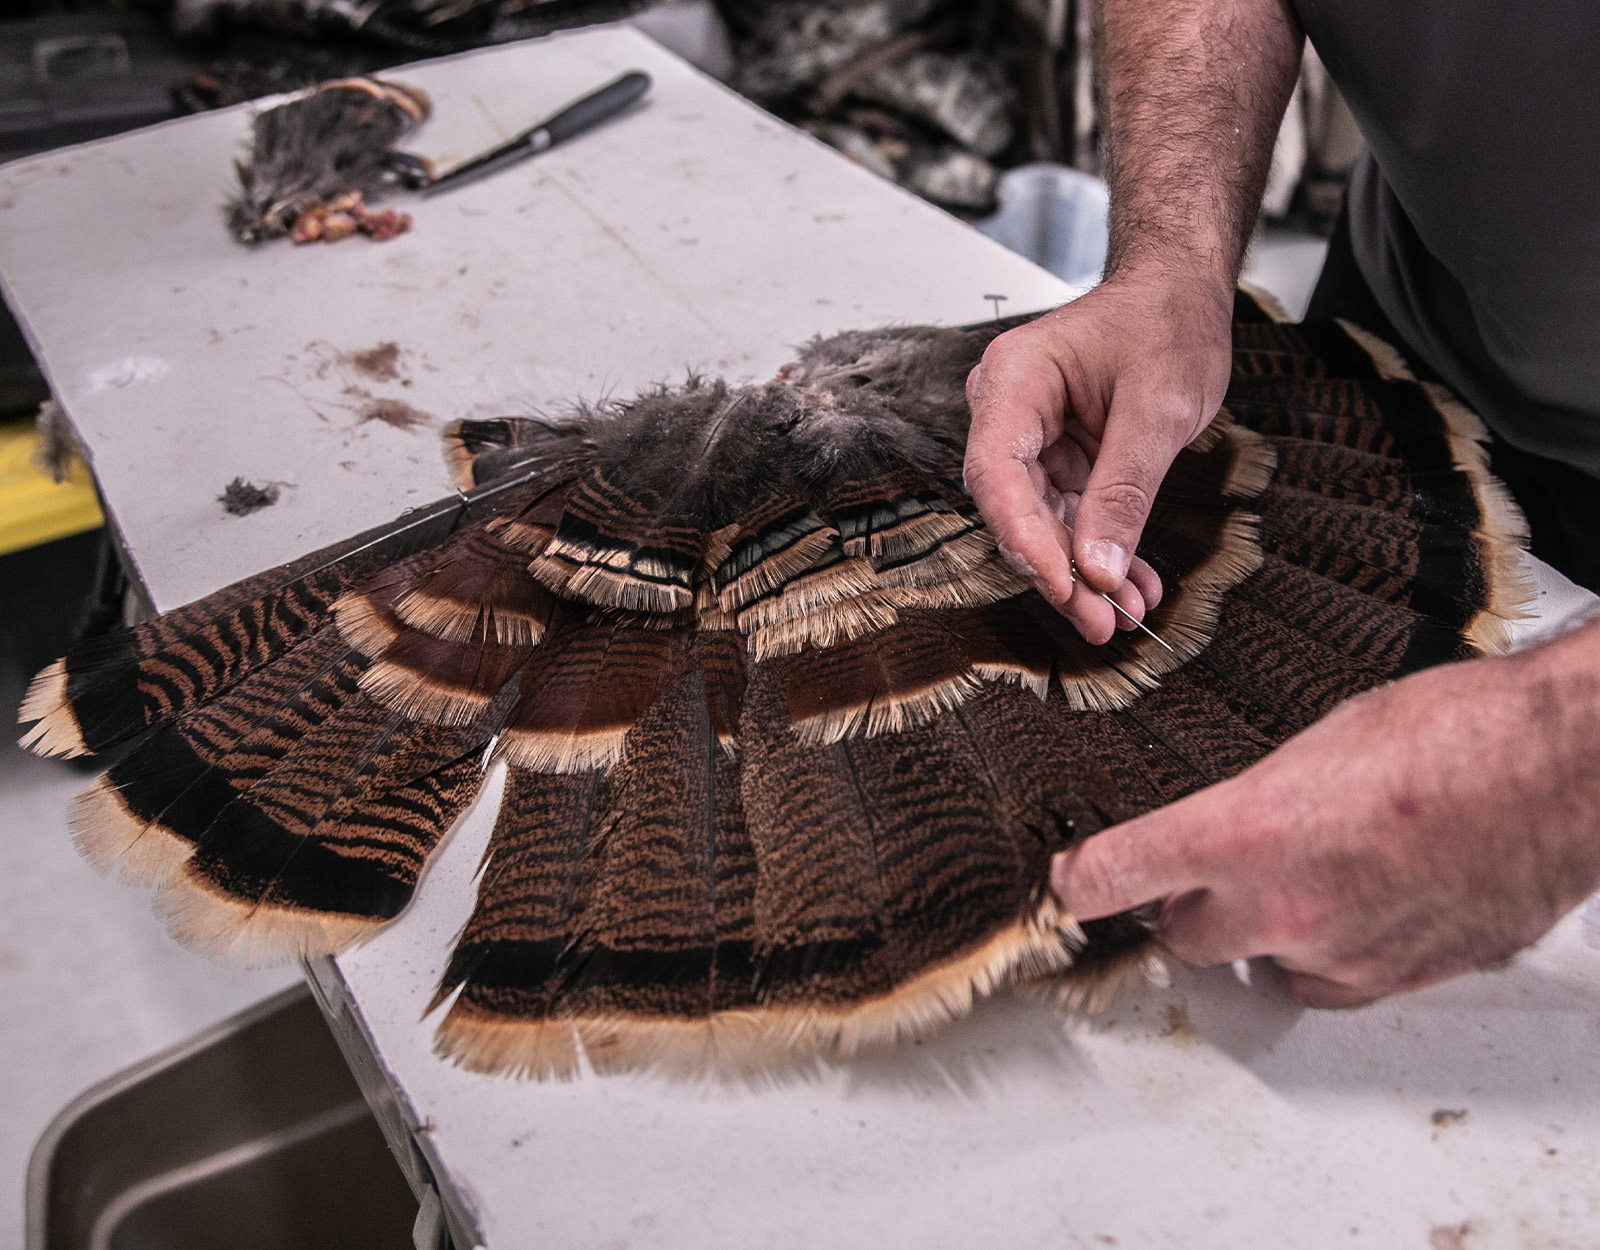
Lay the tail feathers out on cardboard or a board, shaping them into a fan. Use T-pins or staples to secure the feathers in place, being careful not to pin through the feathers. Apply more Borax to fully coat.
Step 5: Let the Fan Dry
Leave the fan to dry in a safe, dry spot for 2-3 weeks. Check it periodically and apply more Borax if any moist areas appear. The tail needs to dry completely to prevent rotting.
Step 6: Remove Pins and Brush Off
Once fully dried, gently remove the pins or staples. Use a dry brush to dust off any Borax powder.
Step 7: Optional Mounting Steps
There are a few optional steps you can take:
-
Coat the base with wood putty or glue to reinforce it.
-
Mount the fan on a plaque or board using hardware.
-
Have a taxidermist add a beard or spurs.
And you’re done! You now have a professionally cured turkey fan ready for displaying.
Tips for Curing Turkey Tails
Follow these tips for best results:
-
Work quickly to remove the tail and start curing before it spoils.
-
Carefully flesh out all fat and tissue from the base.
-
Fully spread the feathers into a fan shape before drying.
-
Use enough Borax to fully coat the skin and base.
-
Let the fan dry completely before removing pins.
-
Store out of direct sunlight to prevent fading.
Frequently Asked Questions
What if some feathers detach while curing?
Don’t worry if a few feathers fall out. The fan will still retain its overall shape. Just remove any loose feathers.
How do I prevent the feathers from becoming brittle?
Avoid over-drying the fan. Remove it once the tissue is cured but before feathers become too brittle.
Can I wash the feathers while curing?
Yes, gentle wash them in soap and water, then completely air dry before curing with Borax.
How long do cured fans typically last?
A properly cured fan can last 10 years or longer. Replace any lost feathers and keep it dusted.
Should I coat the base with wood putty?
It’s optional but wood putty helps harden the base for easier mounting. Let it fully cure before attaching the fan.
Display Your Turkey Hunting Memories
With some simple tools and supplies, you can easily cure a turkey tail fan yourself. Taking the time to preserve and mount the fan makes for a meaningful memento from your successful hunt.
Follow this step-by-step guide for perfectly curing a turkey fan you’ll be proud to display for years to come. Let your beautiful turkey feather souvenir remind you of the great hunt you had.

Preparing the Turkey Fan
After your turkey has been harvested you can get to work on removing its breast and legs or immediately get its tail removed. The best way to remove a turkey tail for displaying as a fan is shown by Lake Pickle in the following video:
In essence, with the bird laying breast side down, you’ll want to use a sharp knife to cut into the meat between the bird’s vent and the base of the tail feathers where you’ll find a small knob. Take care not to cut into any part of the feathers, including the tissue that is holding the feathers together at their base.
As shown below, you can make a small exploratory cut with your knife to expose the knob before cutting toward the body of the bird.
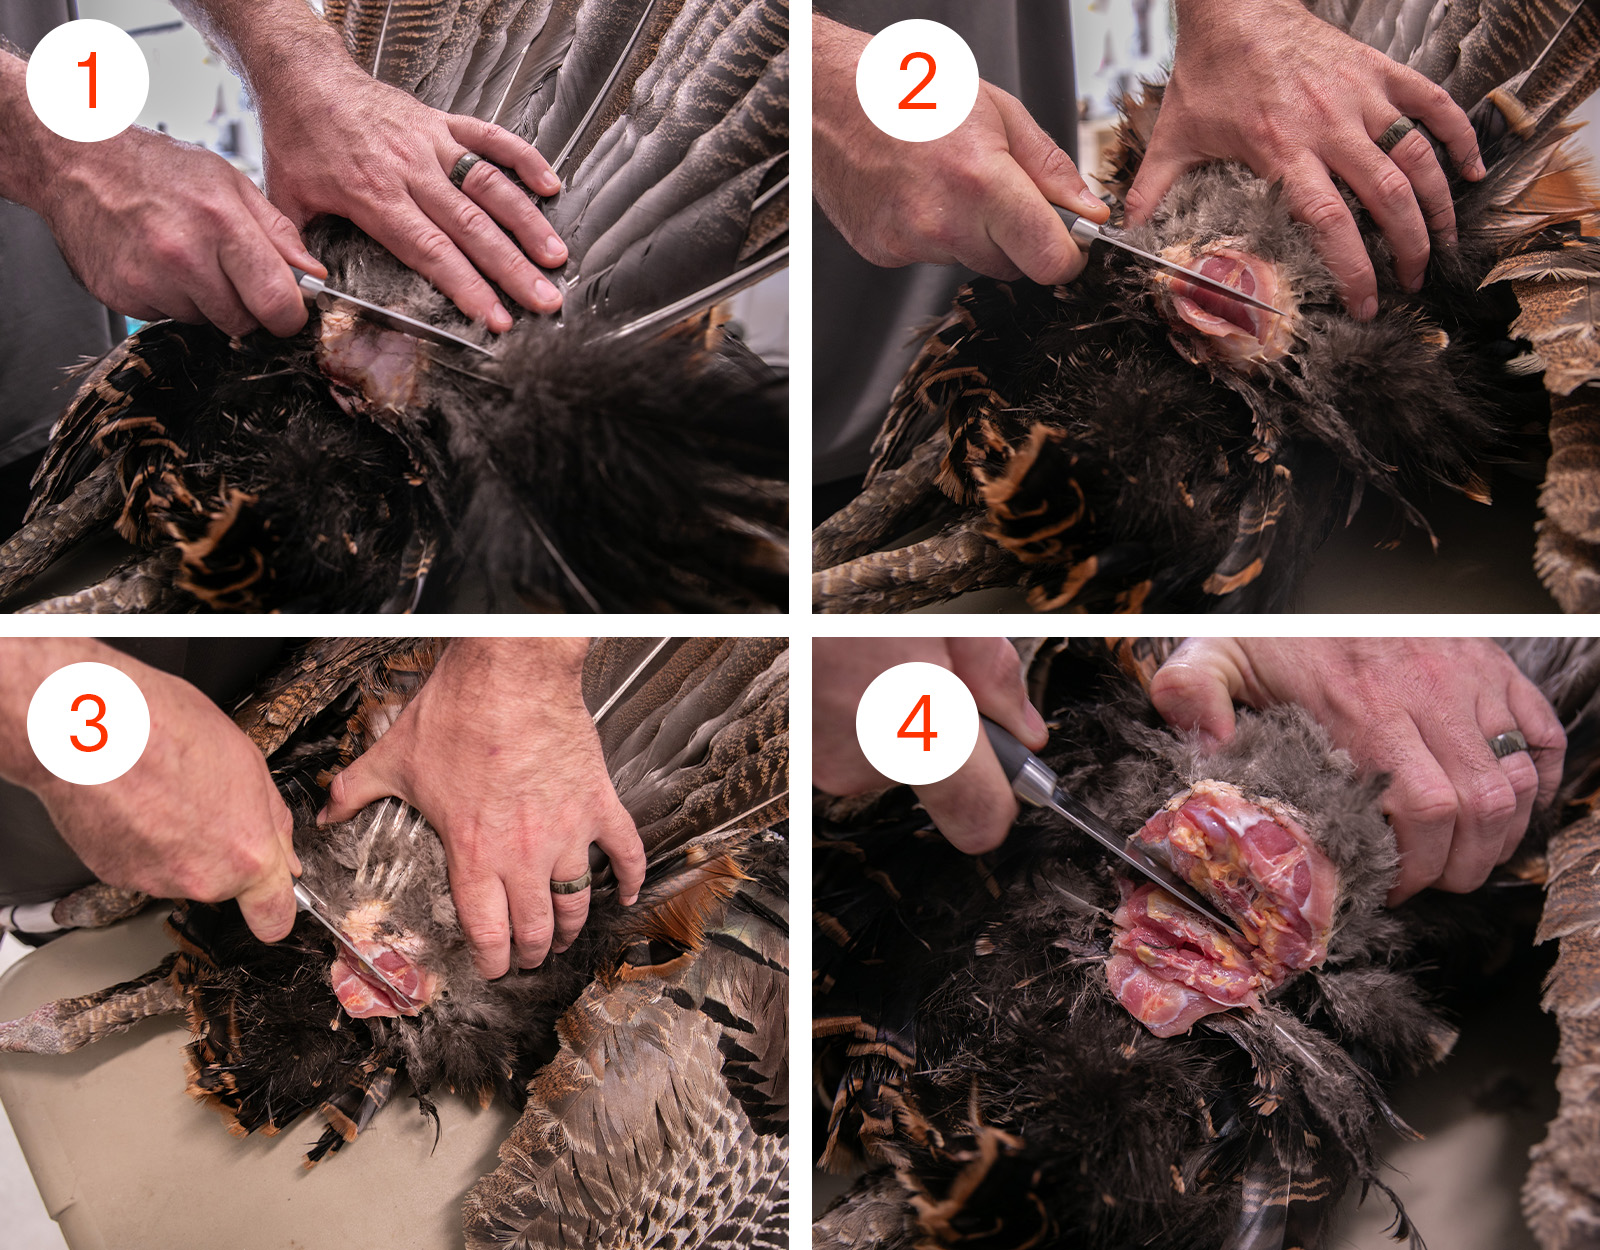
Once the tail fan has been removed, scrape away as much fat and meat as possible to make the drying process more efficient, again taking care not to cut through any connective tissue. You’ll see that some downy feathers might still be on the tail. You can remove those if you wish, but keep all the flat, color-tipped feathers you see. A turkey tail is typically made up of three different lengths of feathers.
As an optional step for preparation, some hunters like to soak the fleshy part of the fan in a coffee can containing Coleman white gas for about an hour to help degrease the tail. After soaking for an hour, remove the fan and wash the part that was soaked with Dawn dish soap, and then use a hair dryer on Low/Medium heat to dry the feathers. This will help the feathers fluff after being washed.
Of course, gas is very flammable and the fumes can be harmful so do this step in a well-ventilated area. Many skip the gas and just wash the feathers and base with Dawn dish soap as much as needed.
Once cut, cleaned out, and washed, you’re ready to start the simple preservation process.

Turkey Fan Preservation Techniques
There are three main ways you can choose to preserve your turkey fan. One is to use Borax. Another uses salt in place of Borax. Or you can choose to pay for a professional taxidermist. The latter costs between $150-$300 depending on whether you also have the beard and spurs preserved and what kind of display mount it used.
One of the major drawbacks of using salt to dry out the tail feathers is the risk of attracting ants and insects while it dries; plus many say the smell of rotting meat is pretty bad.
The popular method is to use Borax, which is what we show below. Borax is sodium tetraborate, a type of salt. It has a pH of 9.5 compared to table salt’s pH of 7. It’s also especially good for degreasing, which is why it’s so often used for cast iron pan restorations.
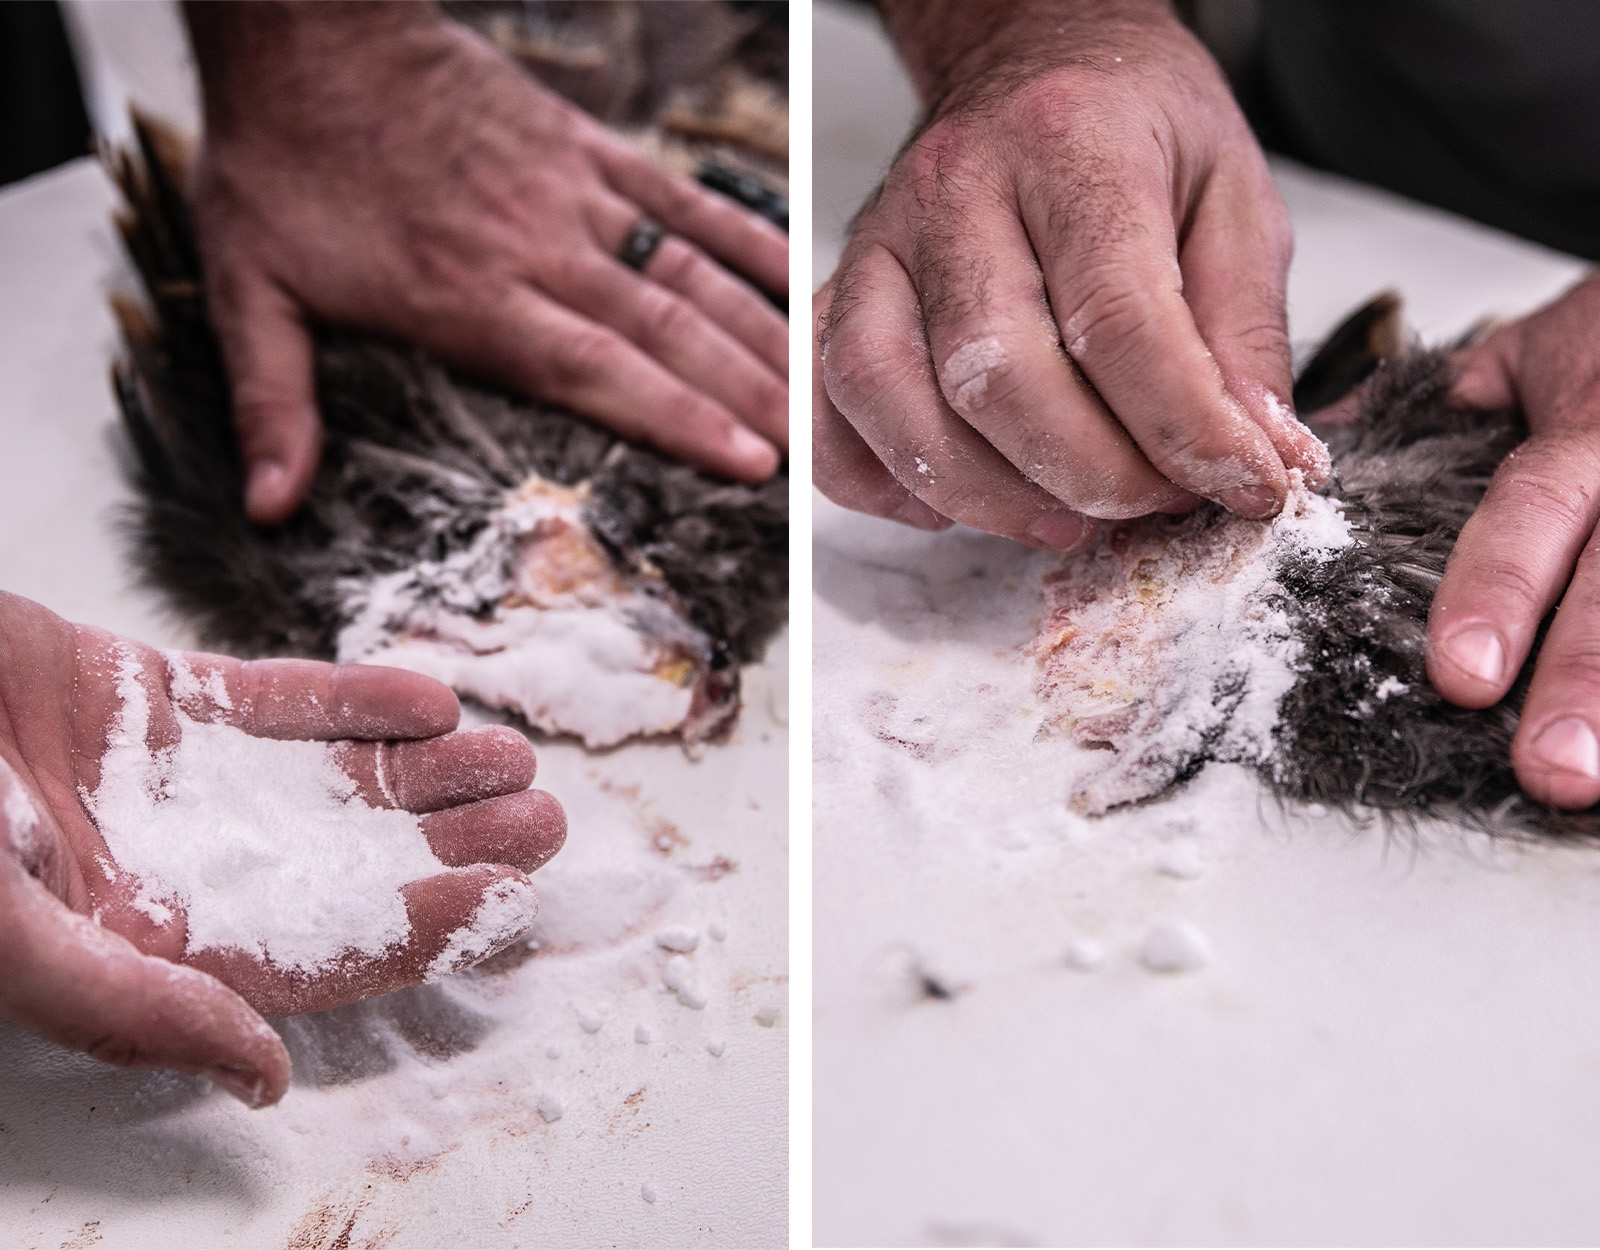
Once you’ve fleshed out the tail as much as possible, apply a generous amount of Borax to any exposed tissue. Make sure you rub it in well, lifting any loose bits of skin and getting both the front and the back side of the tail.
Now you’ll want to spread the tail into its fan shape for drying. Using T-pins and placing the turkey tail on a board or foam board, push one pin into the base of the tail and then working from the outer feathers toward the middle place a T-pin alongside (but not through!) each feather’s shaft (or rachis). Sprinkle a little more Borax on the base of the tail after it’s set in place.
You’ll want to leave your turkey fan to dry for at least a week. Then turn it over, pin if needed, and dry for another week. It may take up to three weeks to fully dry.