Many turkey hunters like to keep the feet from their harvested birds as a trophy to remember the hunt. Mounting the turkey’s feet, spurs, and sometimes legs creates a unique decoration for the home or hunting cabin. While taxidermists can professionally mount feet, do-it-yourself options are much more affordable.
In this article, we’ll look at several techniques for mounting your own turkey feet. We’ll cover drying and preserving the feet, positioning options, and display ideas. With just a bit of time and effort, you can create a custom turkey foot trophy to proudly display.
Why Mount Turkey Feet?
Here are some of the main reasons hunters choose to mount feet from their turkeys:
-
Show off the spurs – A mature tom’s spurs are a badge of honor. Mounting preserves them as a trophy.
-
Remember a special hunt – The feet serve as a lasting memento of the experience
-
Decorate hunting space – Mounted feet make an interesting decoration for a cabin, garage, or “man cave.”
-
Enjoy a DIY project – It’s a fun creative challenge to self-mount the feet
-
Save money – DIY mounting costs a fraction compared to hiring a taxidermist
How to Remove and Prepare the Feet
Start by removing the entire foot at the joint where it meets the leg. Cut carefully around the joint before twisting the foot free. You want the skin and scales intact.
Once removed, there are a few options for preparing the feet for drying:
-
Bury in salt – Burying the whole foot in salt pulls moisture out.
-
Apply borax – Generously coat the skin and flesh with borax powder.
-
Inject with borax – Use a drill to penetrate the bone marrow and fill with borax.
-
Pack with salt – Fill the interior cavities with regular table salt.
These drying agents preserve the foot and prevent decay smells. Leave packed/coated for 1-2 weeks until hardened and dried.
Mounting Positions for Turkey Feet
There are many creative ways to pose the feet for display:
-
Standing – Position as if the bird is standing upright on a base.
-
Kicking – Mount one foot extended forward as if kicking.
-
Alarm – Angle both feet back with toes spread like an alarmed bird.
-
Strutting – Place feet spaced apart with toes forward as if strutting.
-
Mid-step – Pose one foot lifted as if frozen mid-step.
-
Single spur – Mount just one spur from a special tom.
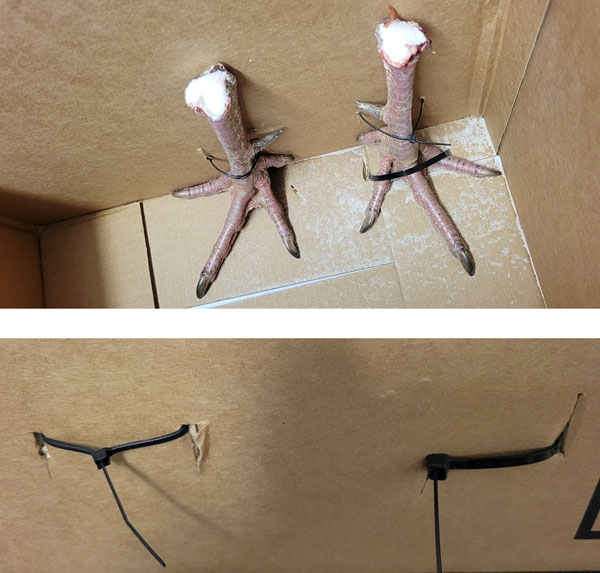
Use wires, nails, clamps, or heavy objects to hold the feet in the desired position while drying. Allow at least 2-3 weeks for full drying time.
How to Display Mounted Turkey Feet
Once dried, you have options for creatively displaying your mounted feet:
-
Pedestal mount – Affix to a wooden base in a standing position.
-
Plaque mount – Attach to a wood plaque or board hung on the wall.
-
Picture mount – Group in a framed shadowbox display with other turkey memorabilia.
-
Single spur mount – Isolate one large spur on a simple wood base.
-
Shell casings – Place spurs inside shotgun shells engraved with hunt details.
-
Dangling mount – Hang spurs dangling from a piece of leather or cord.
-
Foot stool – Adhere feet to the legs of a small stool or ottoman.
-
Coasters – Apply feet to the bottom of round wood slices to make drink coasters.
Let your creativity run wild for a display method that showcases your unique trophy feet.
Alternative Mounting Options
If keeping the entire foot is too tricky, you can just mount sections:
-
Spurs – Cut spurs at the base to remove and dry.
-
Legs – Remove portions of the scaled leg and affix to a base.
-
Toes – Salvage individual curled toes if the rest of the foot is damaged.
These parts create smaller trophies but are easier to preserve than whole feet.
Helpful Tips for DIY Turkey Foot Mounts
Follow these tips for best results preparing and mounting your own turkey feet:
-
Work slowly and carefully when removing feet from the bird.
-
Use a drying agent like borax or salt packs to prevent decay.
-
Position the feet properly using wires, clamps, or heavy objects.
-
Allow several weeks for thorough drying time.
-
Check progress frequently and re-position as needed.
-
Consider safety glasses and gloves when handling dried feet.
-
Display the finished mount creatively in your chosen location.
Buying Pre-Mounted Turkey Feet and Spurs
For hunters short on time or confidence in self-mounting, purchasing finished mounts is an option. Many taxidermists sell:
- Preserved turkey feet
- Mounted spurs and legs
- Framed foot displays
Online retailers also offer a selection of pre-made turkey foot trophies. Prices vary based on size, pose, and detailing.
Purchased mounts offer convenience, but a DIY project holds more sentimental value. With a bit of patience and creativity, you can proudly display self-mounted turkey feet. They’ll become a treasured keepsake and conversation piece for years to come.
Drying Out Other Turkey Parts
Turkey hunters can apply similar drying and mounting methods to preserve other parts of the harvest:
-
Fans – Skin and dry fanned tail feathers to display.
-
Beards – Remove beards intact and dry before mounting.
-
Wings – Carefully remove and dry wings with feathers attached.
-
Heads – Remove, dry, and mount bearded heads using taxidermy techniques.
-
Legs – Detach the scaled legs, dry, and affix to a base.
-
Claws – Preserve the bird’s claws once the toes are thoroughly dried.
With some DIY time and creativity, turkey hunters can economically preserve a wide range of body parts for display.
FAQs About Mounting Turkey Feet
Here are answers to some frequently asked questions about mounting turkey feet yourself:
What’s the best drying agent to use?
Borax powder or granules work very well for drying and preserving feet. Table salt packed inside the feet is also effective.
How long does it take turkey feet to dry?
Expect the drying process to take 2-3 weeks or longer to fully complete. Thicker legs will take more time than just feet.
Can I mount just part of the foot?
Yes, you can remove and mount just the spurs, toes, or a section of leg if desired. The claws can also be preserved once dried.
How do I prevent the feet from decaying?
Injecting or packing the feet with borax or salt will prevent decay and preserve them long-term.
What’s the best glue to use?
A flexible adhesive like E6000 works well for gluing dried turkey parts to bases. Super glue can also be effective.
Conclusion
Mounting turkey feet is an enjoyable way for hunters to memorialize their harvest. With some simple tools and materials, you can inexpensively create a personalized turkey foot trophy. Experiment with various drying techniques and mounting positions to find your favorite presentation method. Display your mounted feet proudly and reminisce over the memorable hunt whenever you see them.