Fan mounting is a great way to preserve the memories you made this season and, unlike big Moose and Deer mounts, can look subtle enough to get the approval of even the non-hunters in your family. These mounts can be created using just a hand full of common household materials and do not require any taxidermy skills to achieve a great result. This article will walk you through step by step, from shot to wall, how to make a fan mount of your own.
One of the most prized parts of a wild turkey harvest is the colorful, fanned tail feathers of a mature tom Mounting a turkey’s fan is a great way to preserve this trophy piece to commemorate a special hunt With some basic supplies and taxidermy techniques, you can learn how to mount a turkey fan for a beautiful display piece.
Supplies Needed
To properly mount a turkey fan you will need
- Turkey tail fan with all feathers intact
- Taxidermy tail mount or wooden plaque
- Fabric backing
- Tacks or staple gun
- Thin wire
- Hot glue gun
- Scissors
- Pliers
- Sandpaper
Preparing the Fan
Start by carefully removing the fan from the turkey, cutting close to the skin without damaging any feathers. Scrape off any excess fat, tissue or skin from the quill base of the feathers. You want just the clean feather shafts remaining.
Examine the fan and pluck any small, broken or irregular feathers. Check that all the main feathers are intact. If any are bent or twisted, use pliers to gently straighten them into alignment.
Use scissors to carefully trim away the fluffy down feathers at the base of the fan and expose more of the quill shaft. Remove all dried blood dirt or debris from the feathers using mild soap and water. Let the fan fully dry.
Mounting Materials
There are two main options for mounting materials:
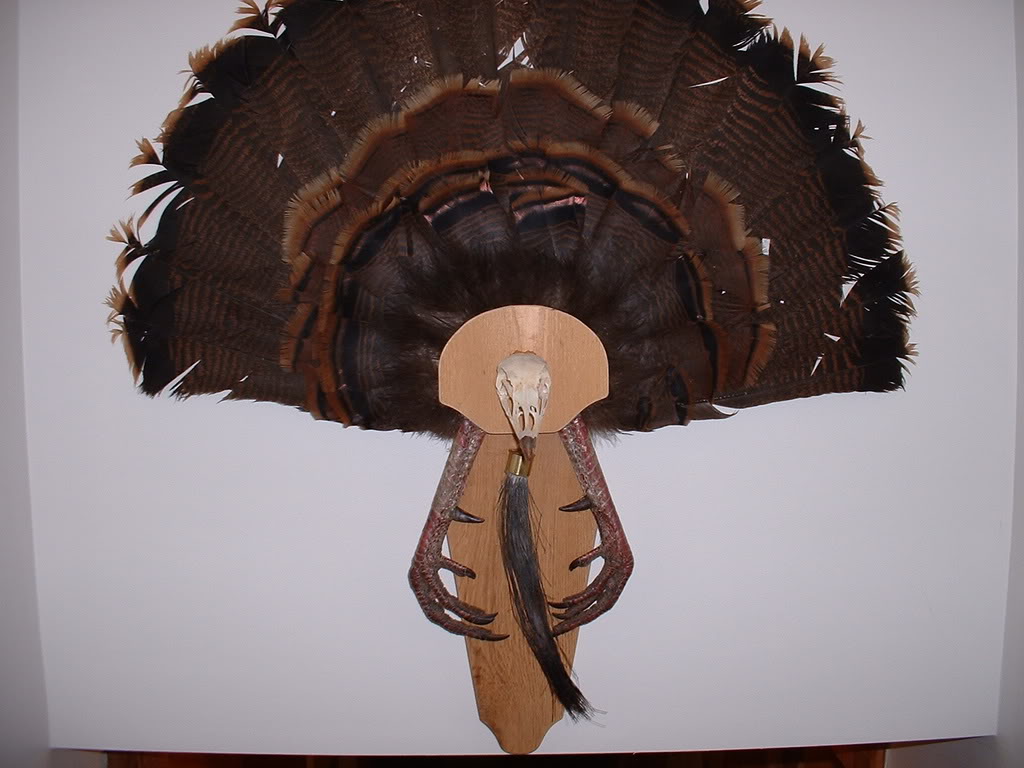
Tail Mount: A carved, contoured foam or wooden mount shaped like a turkey’s fanned tail. The feathers insert directly into pre-cut slits in the foam.
Plaque: A flat wooden plaque, like a shadow box frame, with a fabric backboard. Feathers are arranged and glued to the fabric.
Tail mounts create a more realistic 3D effect, but plaques offer more flexibility in feather placement. Choose whichever you prefer for your display.
Mounting the Feathers
For a tail mount, gently insert the feather quills into the pre-cut slits in the foam or wood base. Place the longest primary feathers near the edges and shorter coverts in the center. Adjust angles and overlaps for best coverage and a natural fanned shape.
For a plaque, lay out feathers on the fabric backboard in the desired arrangement before gluing. Use hot glue to attach the quill ends at the points you want each feather positioned. Build symmetrical sides by gluing matching pairs of feathers opposite each other.
Let all glue dry completely before proceeding. Carefully trim any excess fabric. Add a wire hanger using pliers and wire to create a hanging loop.
Finishing Touches
Once all feathers are positioned and secure, examine the fan for any gaps in coverage. Use small patches of fabric and hot glue to fill any visible holes.
Lightly sand the quill ends to remove any dried tissue or roughness. Be very gentle to avoid damaging feathers. Wipe away all dust.
Spray mount a light coat of clear acrylic sealer to protect feathers and set the finish. Avoid over-spraying to prevent matting or stickiness. Let the sealer fully dry before displaying your mounted turkey fan.
Displaying the Mounted Fan
For the tail mount, affix it to a wooden plaque or display board. Or you can set the contoured form on a shelf, fireplace mantle or tabletop.
For a flat plaque, simply hang it on the wall using the attached wire loop and display your mounted fan that way.
Place it somewhere with indirect sunlight and no extreme heat to prevent feather damage or fading over time. Dust periodically and keep away from moisture. A properly mounted and displayed wild turkey fan makes a great lifelong remembrance of a special hunt.
With the right materials and careful attention to detail, you can learn how to successfully mount a turkey fan for an attractive wall or tabletop display. Follow these steps to preserve and showcase this treasured trophy from your harvested tom.
Step 2: Freeze The Fan
Whether you shoot your bird on opening day or on the last day of the season, it is important to freeze your fan and beard as soon as possible. This will not only keep things from rotting until you get around to creating your mount but also kill any lice or mites that could be living in the feathers. These poultry lice are extremely common in Turkeys and although they can’t be spread to humans, hanging any form lice on your wall is highly discouraged. I typically keep the fan in a plastic grocery bag in the freezer as well to make sure that the dead lice stay in the bag and do not get mixed in with other food you may have in there.
Step 5: Preserving the Mount
After all the fat is removed from in between the feathers, it is time to start preserving the mount. Although some go as far as soaking the feathers in white gas to remove all the oil from the base, I find Borax sufficient at drying the feathers and ensuring there is nothing to rot.
Before adding the borax, spread the fan out on a piece of cardboard and pin the feathers where you want them using small tacks or toothpicks. Once you have all the feathers where you want them, spread the borax liberally over the base of the fan, ensuring it gets underneath and in all of the cracks that could contain meat or oil that could potentially lead to spoiling. I typically let my fan sit in this stage for at least two weeks, occasionally checking the fan and removing anything that looks out of the ordinary. The more time left in borax the better, so don’t be afraid to let it soak for up to a month.

After the settling period has ended, wipe off the extra borax and pin the feather back in place if they have moved. Once this is complete, it is time to prepare the fan for mounting. This is done by creating a plaster seal at the base of the fan that can eventually be screwed through and hung on the wall behind a plaque. Regular Bondo that you would find at a hardware store is great for making the plaster, spread over the base of the fan and left to dry overnight. By the morning, you should have a solid base that will hold your feathers in position and allow it to be hung up and displayed.
How To Mount A Turkey Fan * THE EASY WAY *
FAQ
How long does a turkey fan need to dry before mounting?
How much does a turkey fan mount cost?
|
Chucker
|
$ 400.00
|
|
Turkey Fan, Beard, & Spurs
|
$ 200.00
|
|
Turkey Fan, Beard, Spurs, & Skull
|
$ 225.00
|
|
Turkey Fan, Beard, Wings & Feet
|
$ 400.00
|
|
Turkey Shoulder Mount
|
$ 625.00
|
Do you put Borax or salt on a turkey fan?
How to mount a Turkey fan?
With some household items and a few from the local hardware store you can preserve and mount your own turkey fan. First you’ll want to cut the tail off from the rest of the skin. I leave enough of the back skin and feathers for a nice look on the fan, these can be trimmed later if needed (and saved for other crafts!).
How do you lay a fan’s tail feathers?
Shake off the excess and brush any excess out of the feathers. Lay your fan out flat and arrange the tail feathers how you want them. Pay attention on how the feathers naturally want to lay. You can cheat a little to hide any imperfections with some creative arranging. Set the back feathers down in front of the tail one layer at a time.
What is a turkey tail fan?
Turkeys are some of the most beautiful birds with their iridescent bronze feathers and magnificent tail fans that make your heart skip a beat during turkey season. And I’ve seen some fantastic birds harvested by our amazing ladies! The tail fan is the most distinct part of a wild turkey and preserving it is not that difficult.
Can You mount a Turkey at home?
There are myriad options for mounting turkeys. You can mount the cape and fan, the fan and wings, and any combination that includes the legs, beard or spurs alone. Kits exist to do this all at home. Not only is it satisfying to put in the work yourself, it saves money.