Calling in turkeys during hunting season takes skill, patience, and the right gear. Many hunters use mouth calls, slate calls, or wingbone calls to mimic turkey sounds. But another popular option is a wooden box call. A handmade turkey call box allows you to experiment and customize the design. In this detailed guide, I’ll walk through my process for making a turkey call box from start to finish using basic workshop tools.
Step 1: Choose Your Wood
The first step is selecting the right wood for your turkey call Here are some top options
-
Poplar – Affordable and easy to work with Creates a mellow sound
-
Cherry or Walnut – Dense hardwoods that produce crisp, clear yelps.
-
Cedar – Lightweight and very resonant for louder volumes
-
Mahogany – Rich reddish color and projects sound well. A good all-around choice.
I prefer using a softer wood like poplar or cedar for the box and a harder wood like maple or purpleheart for the paddle. This contrast creates the best acoustics. Shop for wood boards approximately 3/4″ thick and 5″ wide to allow for cutting pieces to size.
Step 2: Cut Box Pieces to Size
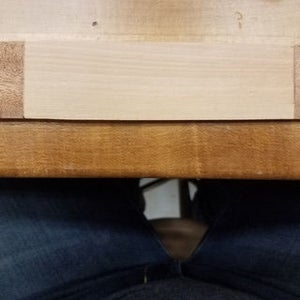
Using a miter or table saw, cut your box wood into lengths between 7-8 inches. This gives you some room to work. For the ends of the box, cut two pieces from a contrasting wood type around 3/4″ wide. I like using maple or walnut as end caps. Glue the end pieces onto the box blank using wood glue and clamps. Let fully cure overnight.
Step 3: Shape the Box
Now you can shape the exterior of the box. Draw angled lines on the sides to mark the slope. Using a band saw or handsaw, carefully cut along your marks to create the angled sides. I recommend between a 5-10 degree angle. Use a rasp and sandpaper to smooth and refine the shape.
Cut an arched shape off the top of the box to achieve a curved “roof” profile. Take your time to get a symmetrical arch on both sides.
Step 4: Add Decorative Details
Here you can get creative with decorative touches like:
-
Wood burning a logo or pattern onto the box sides
-
Inlaying a contrasting wood into the sides for accent stripes
-
Checkering or texturing the surface with a chisel
-
Staining, painting, or burning different colors
Step 5: Hollow Out the Sound Chamber
Lay out the interior dimensions of the sound chamber inside the box. Leave the walls approximately 3/8″ thick to start. Use a Forstner drill bit to bore out most of the wood, creating a hollow chamber. Then use a carving knife, chisel and sandpaper to carefully shape and smooth the interior.
Step 6: Create the Paddle Channel
On the underside of the box’s arched “roof”, carve a channel that extends from side-to-side. Make it approximately 1/4″ deep. This allows clearance for the paddle to move freely across the box. A knife, file or sanding drum attached to a rotary tool works well for this step.
Step 7: Craft the Paddle
The paddle is the most important element for producing sound. Cut your chosen wood into a blank approximately 1 5/8″ wide x 3/8″ thick. Draw the handle shape on one end. Use a band saw to cut out the handle profile.
On the bottom of the paddle, mark a curved radius. Use a belt sander to shape the rounded bottom edge that will sit in the box channel. Sand until smooth.
Step 8: Add Hardware
Drill a 1/8″ hole in the center of the paddle handle to fit the screw. On the opposite end of the box, drill a larger countersunk hole to allow the screw to pass through and attach the paddle.
Place a coiled spring in the countersunk hole. Set the paddle in position and screw it in place. The spring allows tension against the paddle as its pushed and pulled to make sound.
Step 9: Cut the Bottom
Measure the dimensions of the bottom of the box interior. Cut a piece of thin wood at approximately 1/4″ thickness to fit snugly as the bottom cover plate. Glue in place and let dry completely before moving on.
Step 10: Tuning and Finishing Touches
The last steps are tuning the box call and adding protective finish:
-
With the paddle attached, use sandpaper or carving tools to adjust the interior box dimensions and paddle position. Tweak until you achieve the desired realistic turkey sounds.
-
Round over the interior edges of the sound chamber for better acoustics. Go slowly and test frequently while tuning.
-
Use an oil finish or spar varnish to seal and protect the wood. Multiple coats are best for durability.

Step 12: Box Bottom
I cut a 1/4″ thick piece of birch and 1/4″ thick ends of mahogany to match the box. Glue those together you can cut them to size after it dries.
Step 2: Wood Selection
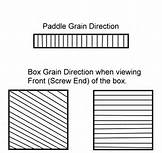
The first step in making a box call is selecting your wood. It is best to use a soft wood for the box and a harder wood for the paddle that has a nice straight grain to make tuning easier. A few good lumber choices for the box are: Poplar, Butternut, Mahogany, Walnut, Cherry, & Cedar. For Paddles: Maple, Walnut, Cherry, Purple heart, Zebra wood, Osage, and Yellow heart.
Easy DIY Turkey Box Call!
FAQ
What is the best wood to make a turkey box call?
How far can a turkey hear a box call?